Forms, Surveys & Quizzes
Forms, surveys, and quizzes are how your CRM captures structured information from prospects and customers. Each tool has a different job, and choosing the right one for a given situation makes a real difference in how many people complete it and what you get from the data.
This page covers all three — when to use each, how to build them, and how the submissions flow into your CRM so you can follow up automatically.
Forms — the workhorse of lead capture
Section titled “Forms — the workhorse of lead capture”
The form builder lets you add, remove, and configure fields with a drag-and-drop interface — no code needed, and every submission creates or updates a contact record automatically.
A Form is the simplest way to collect information from someone and turn them into a contact in your CRM. When someone submits a form, the data lands in your CRM as a contact record — and you can trigger an automated workflow off that submission the moment it happens.
Use forms for:
- Lead capture on a landing page or website (name, phone, email)
- Contact or inquiry forms on your main website
- Intake forms that collect details before an appointment
- Event registration
- Opt-in forms for a newsletter or lead magnet
Building a form
Section titled “Building a form”- From the left navigation, go to Sites → Forms (some versions have Forms in its own section; look in both places).
- Click + New Form (or Create Form).
- Give your form an internal name that makes it easy to identify later (e.g., “Homepage Contact Form” or “Free Consultation Intake”).
- In the builder, use the left panel to drag fields onto the form canvas. The most common fields you’ll reach for:
- First Name / Last Name
- Phone Number
- Email Address
- Text Area — for open-ended questions or messages
- Dropdown / Radio Buttons / Checkboxes — for multiple-choice questions
- Date Picker — for scheduling or deadline fields
- Custom Fields — if your CRM account has custom fields configured for contacts, they’re available here
- Click any field on the canvas to edit its Label (what the visitor sees), Placeholder text, and whether the field is Required.
- Add a Submit Button if one isn’t already present — customize the button text (e.g., “Send My Request” beats “Submit”).
- Configure the Thank You / Redirect behavior: after submission, should the visitor see a thank-you message on the same page, or be redirected to a URL? A redirect to a dedicated thank-you page is generally the better choice for tracking and follow-up.
- Click Save.
Embedding a form on your site
Section titled “Embedding a form on your site”Once saved, every form has two ways to share it:
- Embed code — click the Share or Embed button on the form to copy an
<iframe>or JavaScript snippet. Paste this into any web page — inside your CRM site builder, or on an external site. - Standalone link — a direct URL that takes someone to a hosted version of your form with no other page around it. Shareable via text, email, or social.
How form submissions flow into Contacts
Section titled “How form submissions flow into Contacts”Every submission automatically creates a new contact record — or updates the existing record if the submitted email or phone number matches someone already in your CRM. The field values map to contact profile fields (standard and custom), and a submission event is logged in the contact’s activity timeline.
You can then trigger a workflow on the Form Submitted trigger to send an immediate follow-up, add a tag, create a task, or enroll the contact in a nurture sequence. See Automation & Workflows for how to connect forms to automated follow-up.
Surveys — multi-step data collection with conditional logic
Section titled “Surveys — multi-step data collection with conditional logic”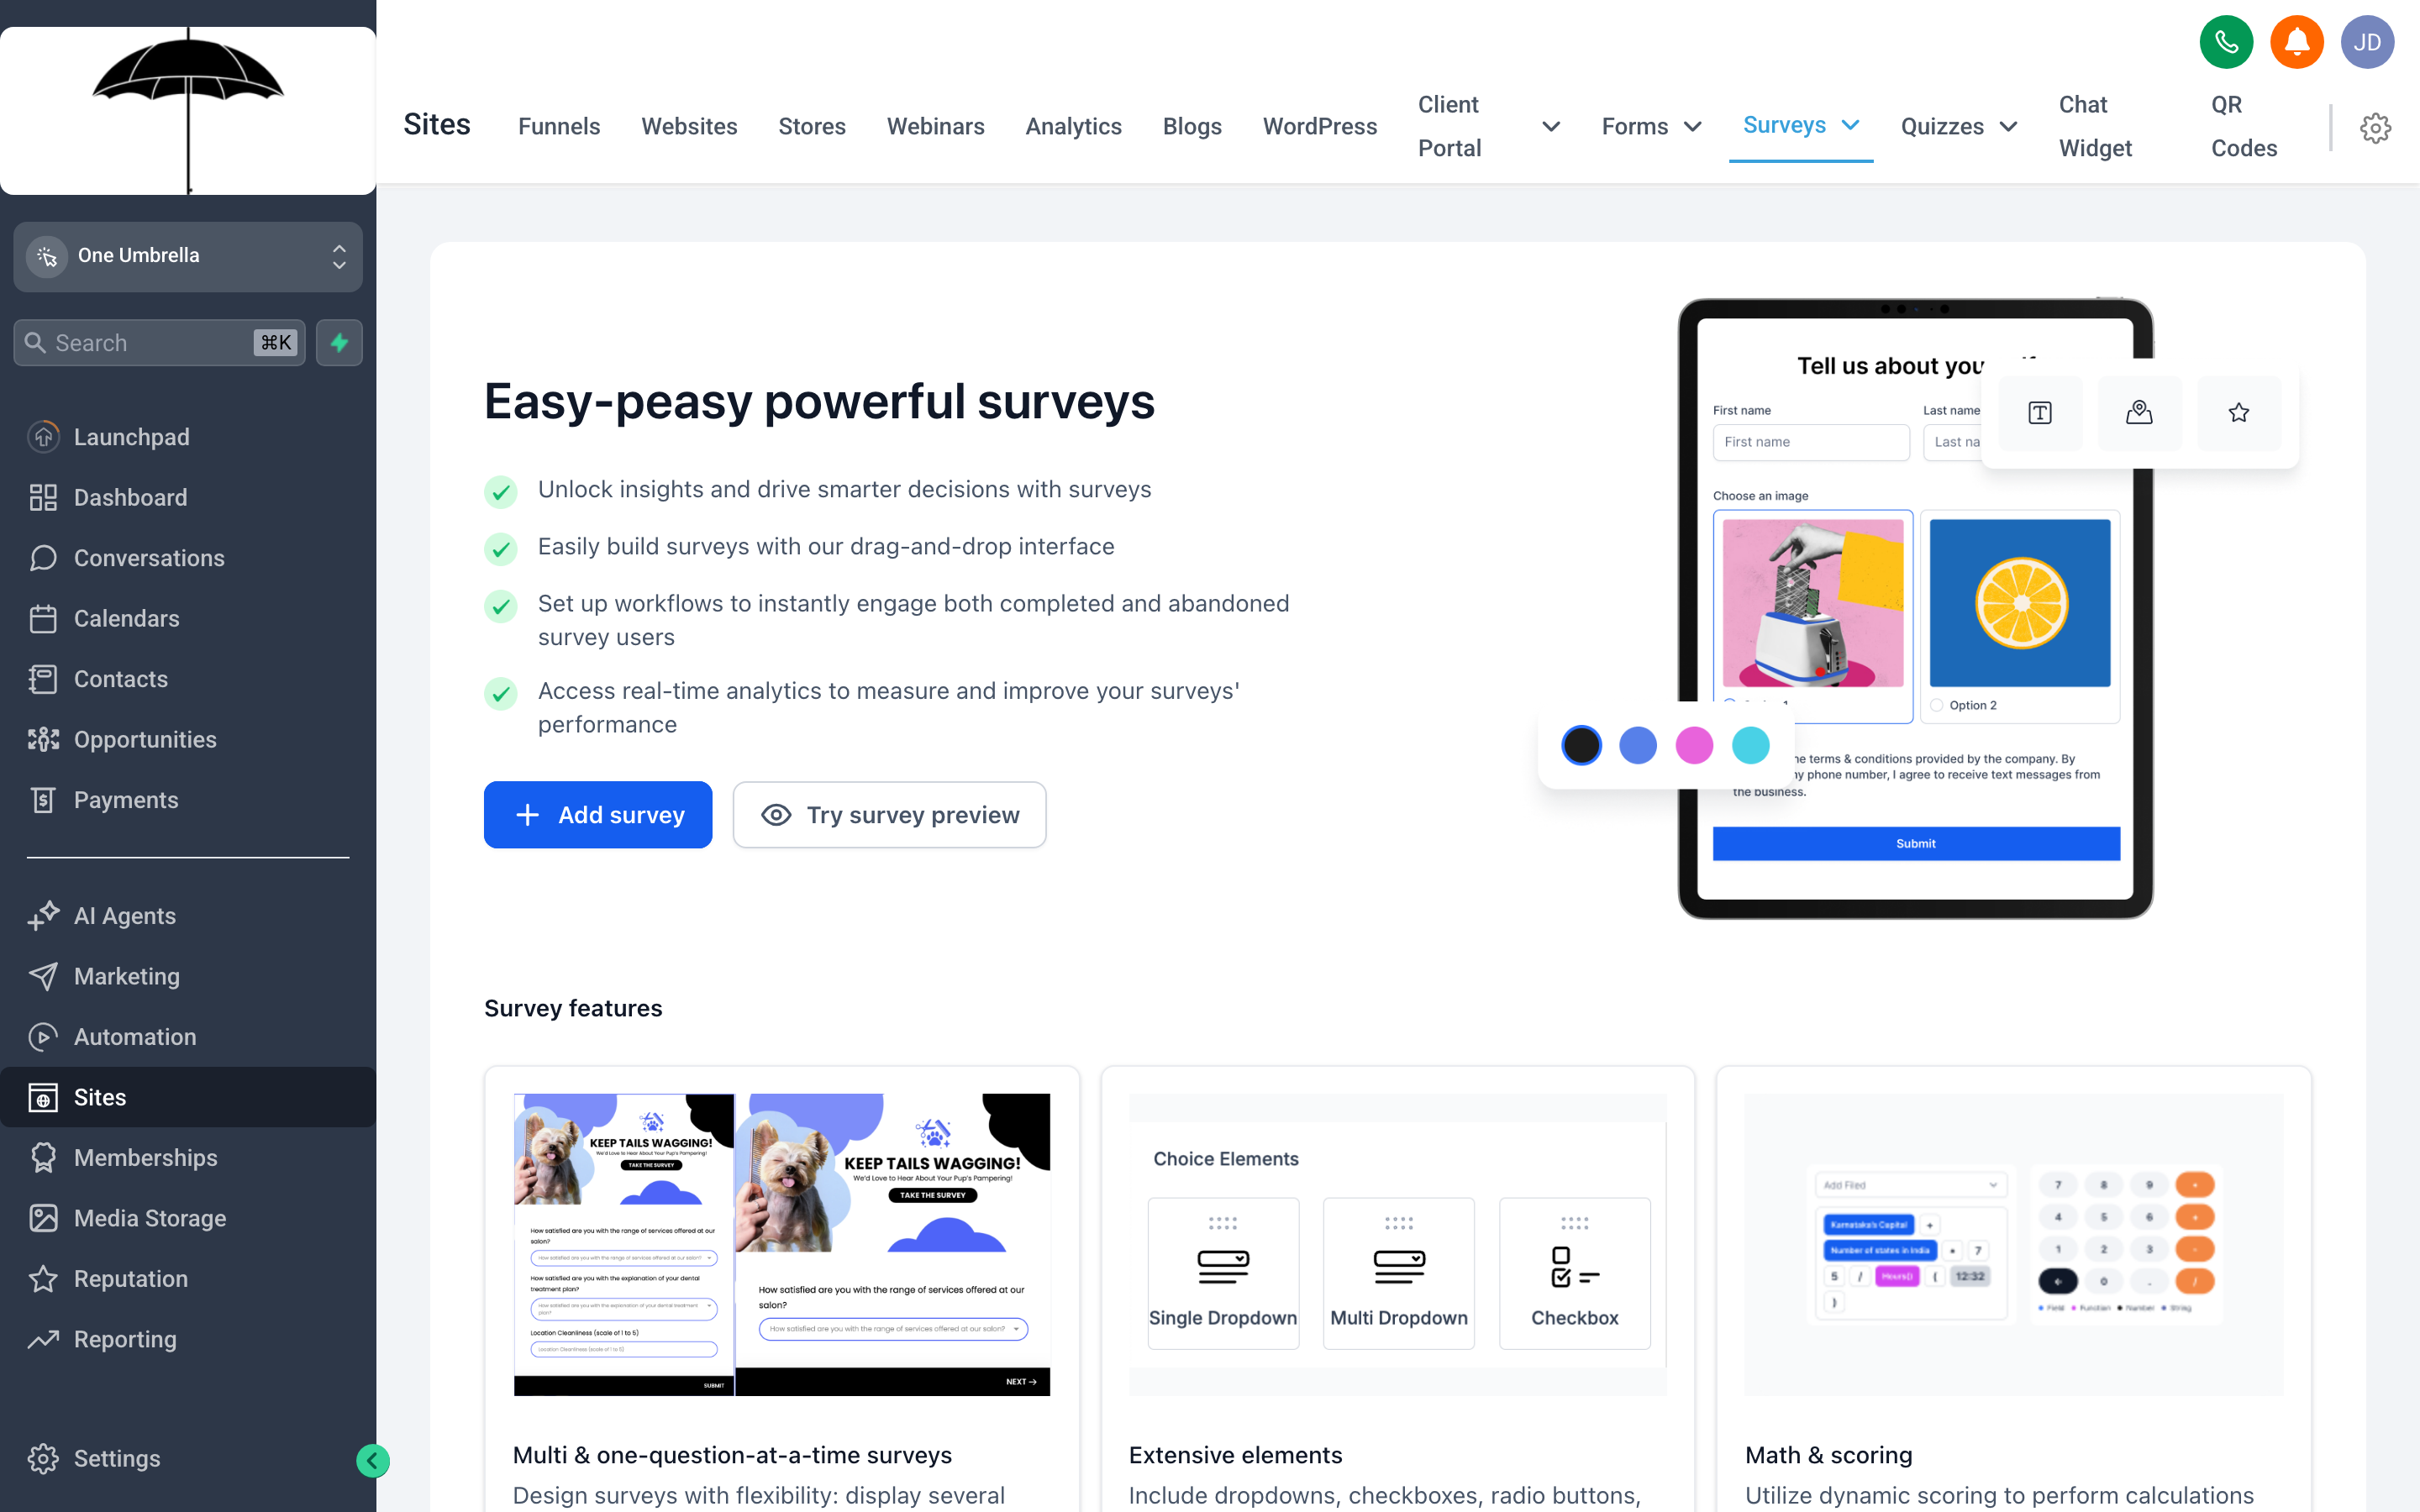
Surveys let you build multi-step questionnaires where later questions can change based on earlier answers — useful for qualifying leads or gathering structured feedback.
A Survey is designed for situations where a simple one-page form isn’t enough. Surveys are multi-step (each question or group of questions gets its own screen), and they support conditional logic — the path through the survey can change based on how someone answers.
Use surveys for:
- Multi-step lead qualification (ask a few questions before showing someone your calendar)
- Post-service or post-purchase feedback
- Application processes where you want to screen respondents before following up
- Discovery questionnaires before a sales call
- Research or audience segmentation
Building a survey
Section titled “Building a survey”- In Sites → Surveys (or the Surveys section), click + New Survey.
- Give it an internal name.
- Use the builder to create Steps (screens). Each step can contain one or more questions. Click + Add Step to build out the sequence.
- Within each step, add fields using the same field types available in forms: text, dropdown, radio buttons, checkboxes, date picker, rating scale, etc.
- To add Conditional Logic to a step:
- Click the step or field you want to add branching to.
- Look for a Logic or Conditions tab in the settings panel.
- Set the condition: “If answer to Question 2 is [value], skip to Step 5” or “If answer is [other value], show this step.”
- Configure the end behavior: a thank-you message or redirect URL.
- Click Save.
Conditional logic: what it actually does
Section titled “Conditional logic: what it actually does”Without conditional logic, everyone who takes your survey sees every question in the same order. With conditional logic, you can skip irrelevant steps or show different follow-up questions based on a response.
Example: You ask “Are you currently working with another vendor?” If they say Yes, show a follow-up question about their timeline. If they say No, skip that question entirely. This keeps the survey shorter for people who don’t need certain questions, which improves completion rates.
Sharing and embedding surveys
Section titled “Sharing and embedding surveys”Like forms, surveys have both an embed code and a standalone link. The standalone link is especially useful for surveys you share via email or SMS — send the link, and the recipient taps through to the survey without needing to navigate to your website.
Quizzes — interactive lead magnets with scoring
Section titled “Quizzes — interactive lead magnets with scoring”
Quizzes go beyond data collection — they give respondents a result, score, or recommendation, making them inherently more engaging and shareable than a standard form or survey.
A Quiz is an interactive tool that presents questions, collects answers, assigns a score or result, and then shows the respondent an outcome based on their answers. Quizzes feel like an experience rather than a form, which makes them more engaging and more likely to be completed and shared.
Use quizzes for:
- Lead magnet quizzes (“What type of [X] are you?”, “Is your [Y] optimized?”)
- Qualification tools that categorize leads by score into different follow-up tracks
- Assessment tools that help prospects understand their own situation and why they need your service
- Fun, shareable content for social or email campaigns
Building a quiz
Section titled “Building a quiz”- In Sites → Quizzes (or the Quizzes section), click + New Quiz.
- Give it a name and choose the quiz format — most quizzes are either scored (each answer is worth points, and the total score determines the result) or outcome-based (each answer maps to a category, and the most common category determines the result).
- Add your questions. For each question:
- Write the question text.
- Add answer choices.
- Assign a point value to each answer (for scored quizzes) or map each answer to an outcome category (for outcome-based quizzes).
- Create your Results Pages — one page per possible score range or outcome. Each result page typically includes:
- A headline that names the result (“You’re a Strong Candidate for [Service]!”)
- A brief description of what that result means
- A clear call to action (book a call, claim an offer, etc.)
- Optionally, require an email address (and optionally name and phone) before showing the results. This gates the result behind a contact capture — a natural exchange of value.
- Click Save.
How quiz submissions flow into Contacts
Section titled “How quiz submissions flow into Contacts”When someone completes a quiz (especially if you’ve gated results behind an email opt-in), their contact record is created or updated automatically. Quiz result data — their score, their outcome category, or specific answers — can be stored in custom contact fields, which then makes them available for:
- Segmentation — Smart Lists filtered by quiz result
- Automation — workflows triggered by quiz score (high-score contacts get an immediate sales follow-up; low-score contacts get a nurture sequence)
- Personalization — email copy that references their specific result
To set this up, configure the field mapping in your quiz settings: map each quiz answer or outcome to the appropriate contact field so the data lands in the right place when someone submits.
How submissions trigger workflows
Section titled “How submissions trigger workflows”All three tools — forms, surveys, and quizzes — can be connected to automated workflows via the same Form Submitted (or submission-type) trigger in the workflow builder. When you pick that trigger, you’ll be asked to select which specific form, survey, or quiz it should respond to.
This means a single submission can:
- Create or update a contact record
- Fire a workflow that sends a confirmation text within seconds
- Add a tag to classify the contact
- Notify your team with an internal alert
- Create a follow-up task with a due date
All of that happens automatically, without anyone on your team lifting a finger. See Automation & Workflows for a full walkthrough.
Embedding and sharing — your options at a glance
Section titled “Embedding and sharing — your options at a glance”| Method | Best for |
|---|---|
| Embed code (iframe or JS snippet) | Placing the form/survey/quiz inside an external website |
| CRM page builder element | Dropping it onto a funnel or website page built inside your CRM |
| Standalone link | Sharing via text, email, social, or direct link |
| QR code | Print materials, in-person events, signs |
Most form builders will generate a QR code for you as well — look for it in the Share settings. QR codes are useful for in-person events where you want people to fill something out on the spot.
Tips for better form completion rates
Section titled “Tips for better form completion rates”The single biggest lever on form completion is length. Every field you add is a reason someone can abandon the form. A few principles:
Only ask what you actually need right now. If you don’t need someone’s mailing address to send them a lead magnet, don’t ask for it. You can collect additional information later — on an intake form before their appointment, in a survey after they become a client, or in conversation.
Make phone optional if you can. Phone number is often the highest-friction field on a lead capture form. If your follow-up process starts with email, consider making phone optional or not including it at all on the first form. You can ask for it once they’ve engaged.
Put the most important fields first. If the form abandons halfway through, you want to have captured name and email before you lose them. Don’t bury contact info at the bottom.
Test on mobile before you publish. A majority of form completions happen on phones. A form that looks great on desktop but has tiny fields and awkward scrolling on mobile will underperform.
Match the ask to where the person is in the relationship. A visitor arriving from a cold ad gets a short form (name, email, maybe phone). An existing customer filling out a pre-appointment intake form can reasonably provide more detail — they already know and trust you.