Settings: Fields, Tags & Data
Custom Fields let you capture information that’s specific to your business — not just what every CRM ships with by default, but the data that actually drives your process.
Your CRM comes with standard contact fields — name, email, phone, address — but no two businesses track the same information. A home services company needs to know a contact’s property type and square footage. A coaching practice wants to track a client’s goal and program tier. A B2B team needs company size and decision-making timeline.
The settings in this section let you define exactly what data your CRM collects, how it’s stored, and how it flows through your messages, automations, and reports. Get these right and personalization stops being a marketing buzzword and starts being how you actually communicate.
Custom Fields
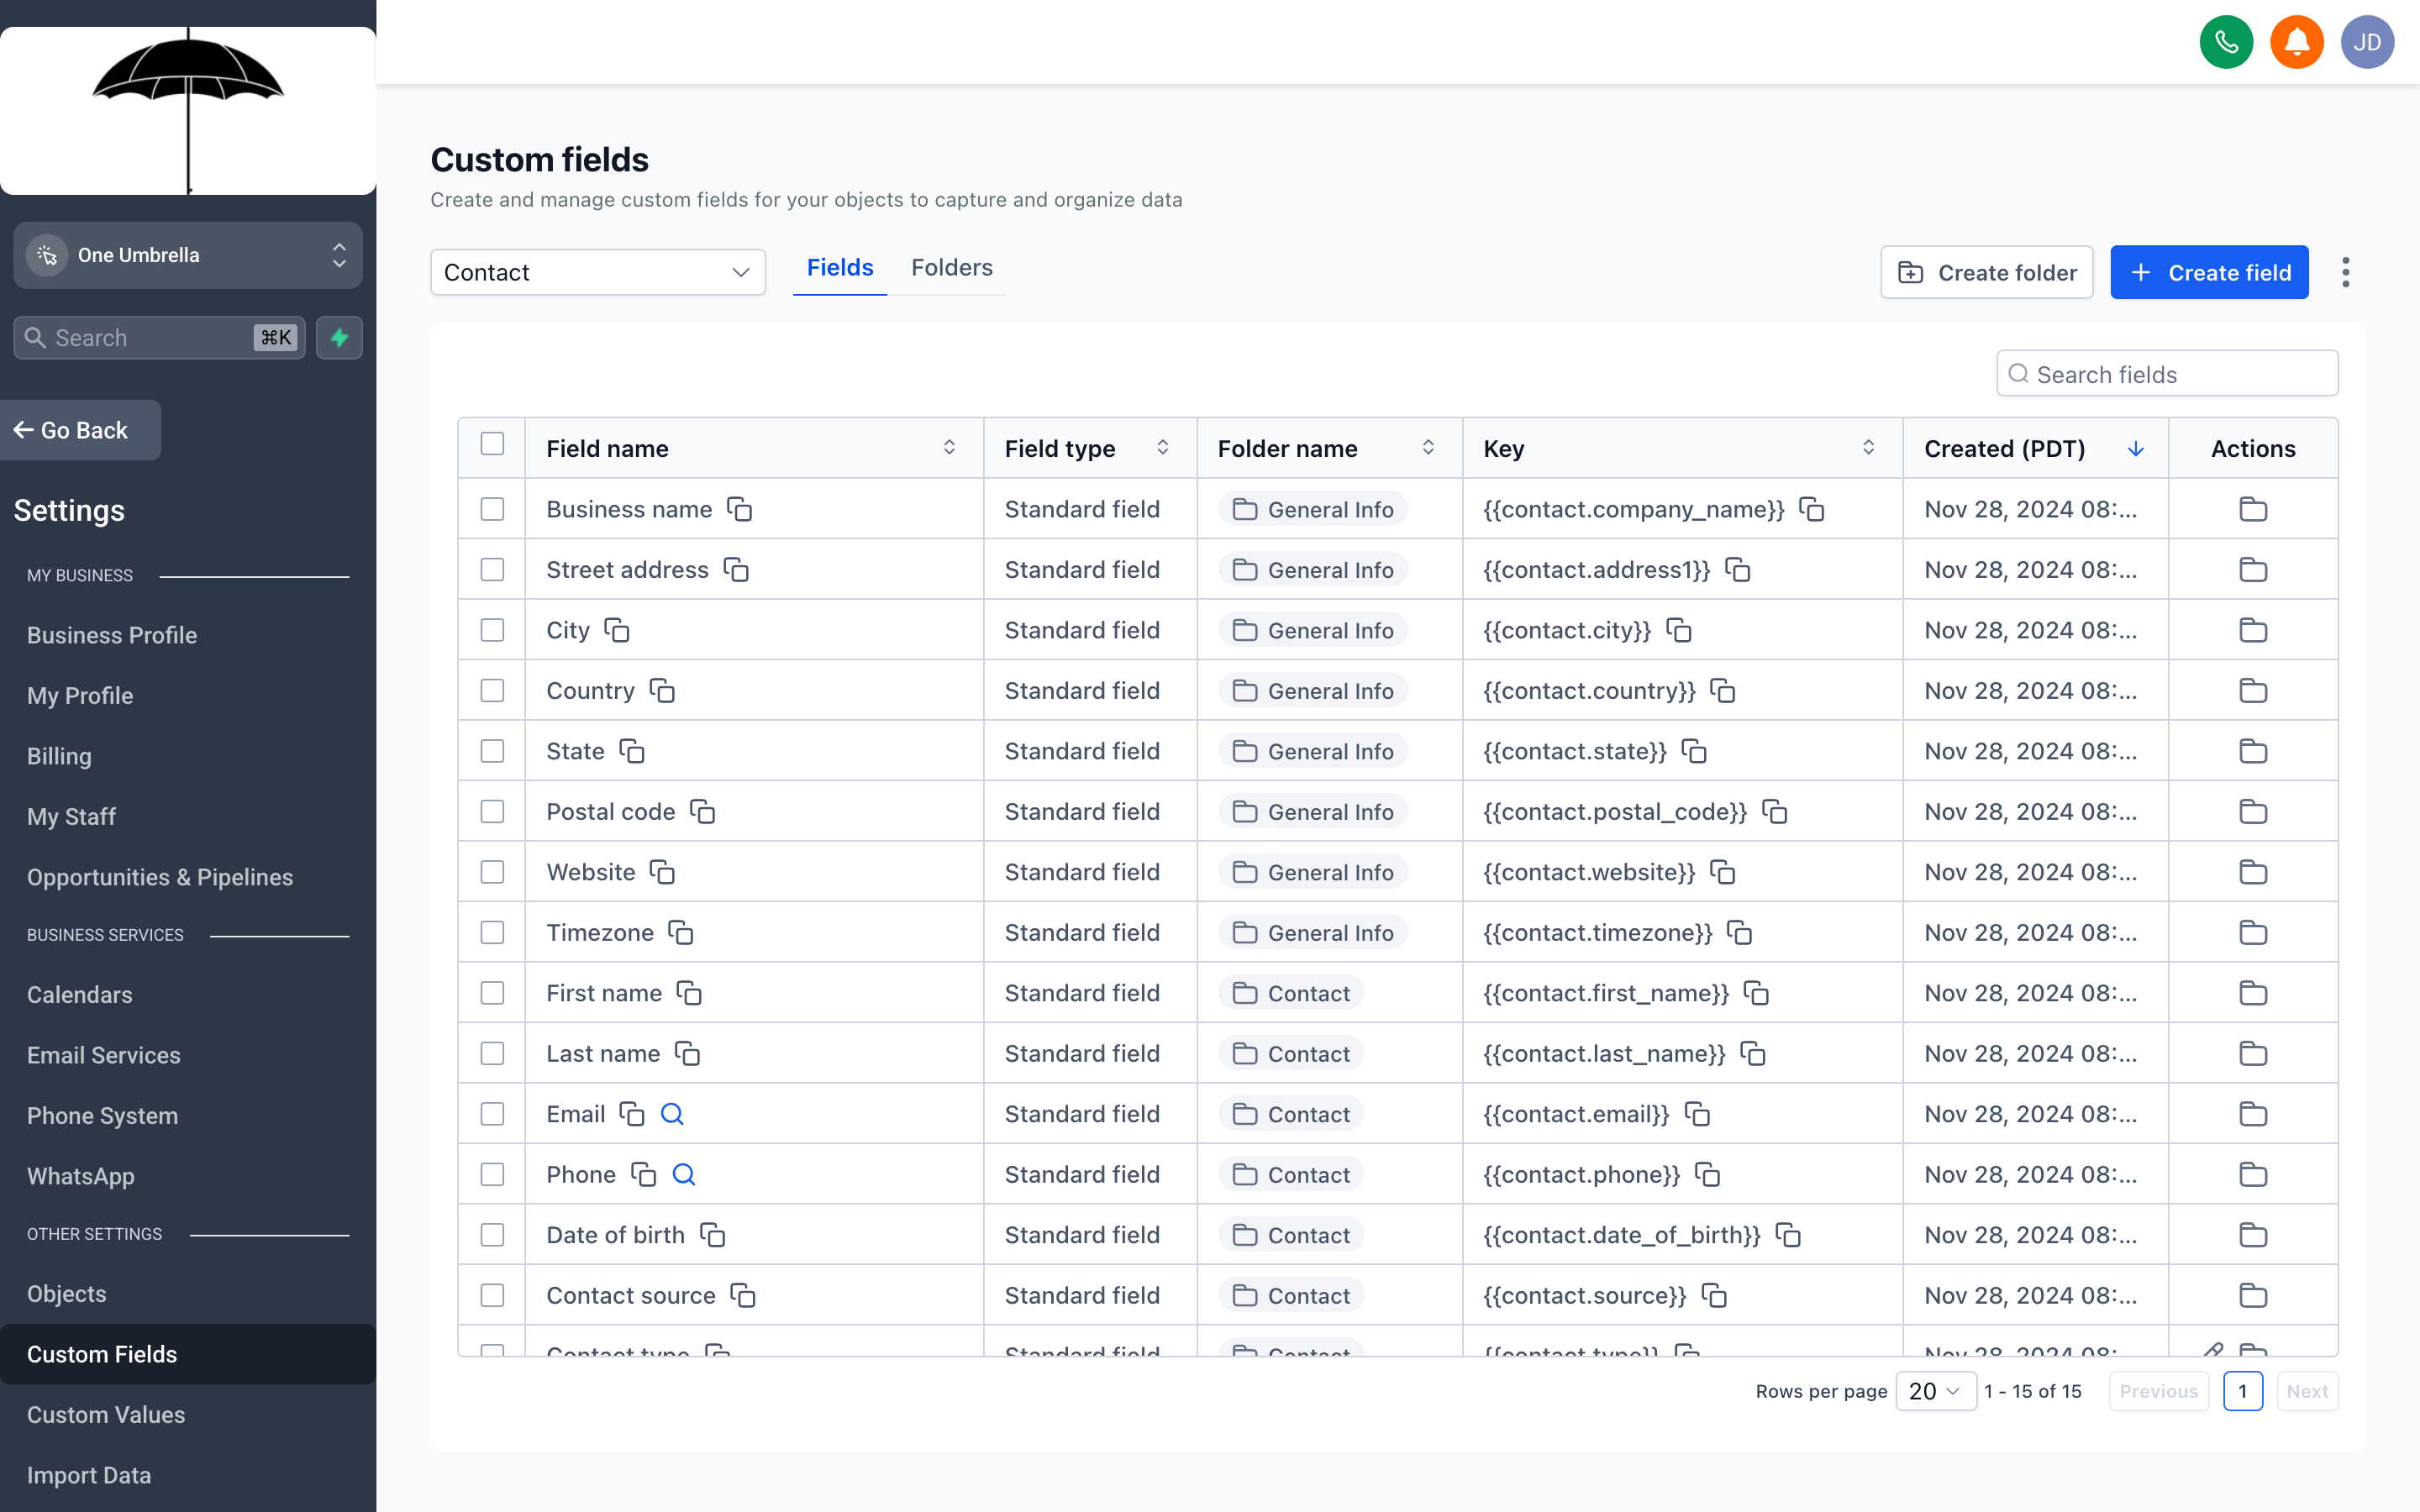
Section titled “Custom Fields”Go to Settings → Custom Fields to add fields beyond the CRM’s built-in defaults.
What custom fields are for
Section titled “What custom fields are for”Custom fields capture contact-specific or opportunity-specific data that your business needs to track. Once created, a field:
- Appears on contact and opportunity records so your team can fill it in
- Can be included in forms so contacts fill it in themselves
- Becomes available as a merge tag inside emails, SMS messages, and automations (e.g.,
{{contact.program_tier}}) - Can be used as a filter in your contact lists to build targeted segments
Field types
Section titled “Field types”When you create a field, you choose a type:
| Type | Use when |
|---|---|
| Text | Single-line responses (job title, referral source, preferred name) |
| Text Area | Multi-line responses (notes, a brief bio, specific instructions) |
| Number | Numeric values you might want to sort or compare (square footage, budget) |
| Date | Dates beyond birthday — contract renewal, last service, sign-up anniversary |
| Dropdown | A fixed list of options (lead source, status, plan tier) |
| Checkbox | True/false or opted-in/opted-out flags |
| Radio | Single-select from a short list |
| File Upload | Let contacts upload documents through a form |
| Monetary | Dollar amounts — useful for deal size, quoted price |
Creating a custom field
Section titled “Creating a custom field”- Click Add Field.
- Give the field a clear Label (this is what shows on the contact record).
- Select the Field Type.
- If you chose Dropdown or Radio, add your list options.
- Set whether the field applies to Contacts, Opportunities, or both.
- Click Save.
Custom Values
Section titled “Custom Values”
Custom Values are reusable placeholders that hold a piece of text — your business address, a discount code, a booking link — so you update it in one place and it changes everywhere it’s used.
Go to Settings → Custom Values to create and manage reusable text variables.
The difference between custom fields and custom values
Section titled “The difference between custom fields and custom values”- Custom fields are per-contact — each contact has their own value for that field.
- Custom values are account-level — one value that’s the same across every message, every contact, every automation.
Think of a custom value like a variable in a document template. You define {{custom_value.booking_link}} once and drop it into 40 different email templates. When your booking link changes, you update the custom value and all 40 templates are updated automatically.
What to use them for
Section titled “What to use them for”- Your business website URL
- A recurring discount code or offer
- Your physical address (for email footers)
- Your scheduling or booking page link
- A phone number you reference in multiple templates
- Seasonal promotions — create one value, update it when the campaign changes
Creating a custom value
Section titled “Creating a custom value”- Click Add Custom Value.
- Enter a descriptive Name (this becomes part of the merge tag — keep it lowercase with underscores, e.g.,
booking_link). - Enter the Value — the actual text that will be inserted wherever the tag is used.
- Click Save.
The merge tag format is {{custom_values.your_name}}. Copy it directly from the Custom Values list and paste it into any template or message.
Tags are flexible labels you attach to contacts to mark status, behavior, or segment membership — the foundation of list-based targeting and workflow logic.
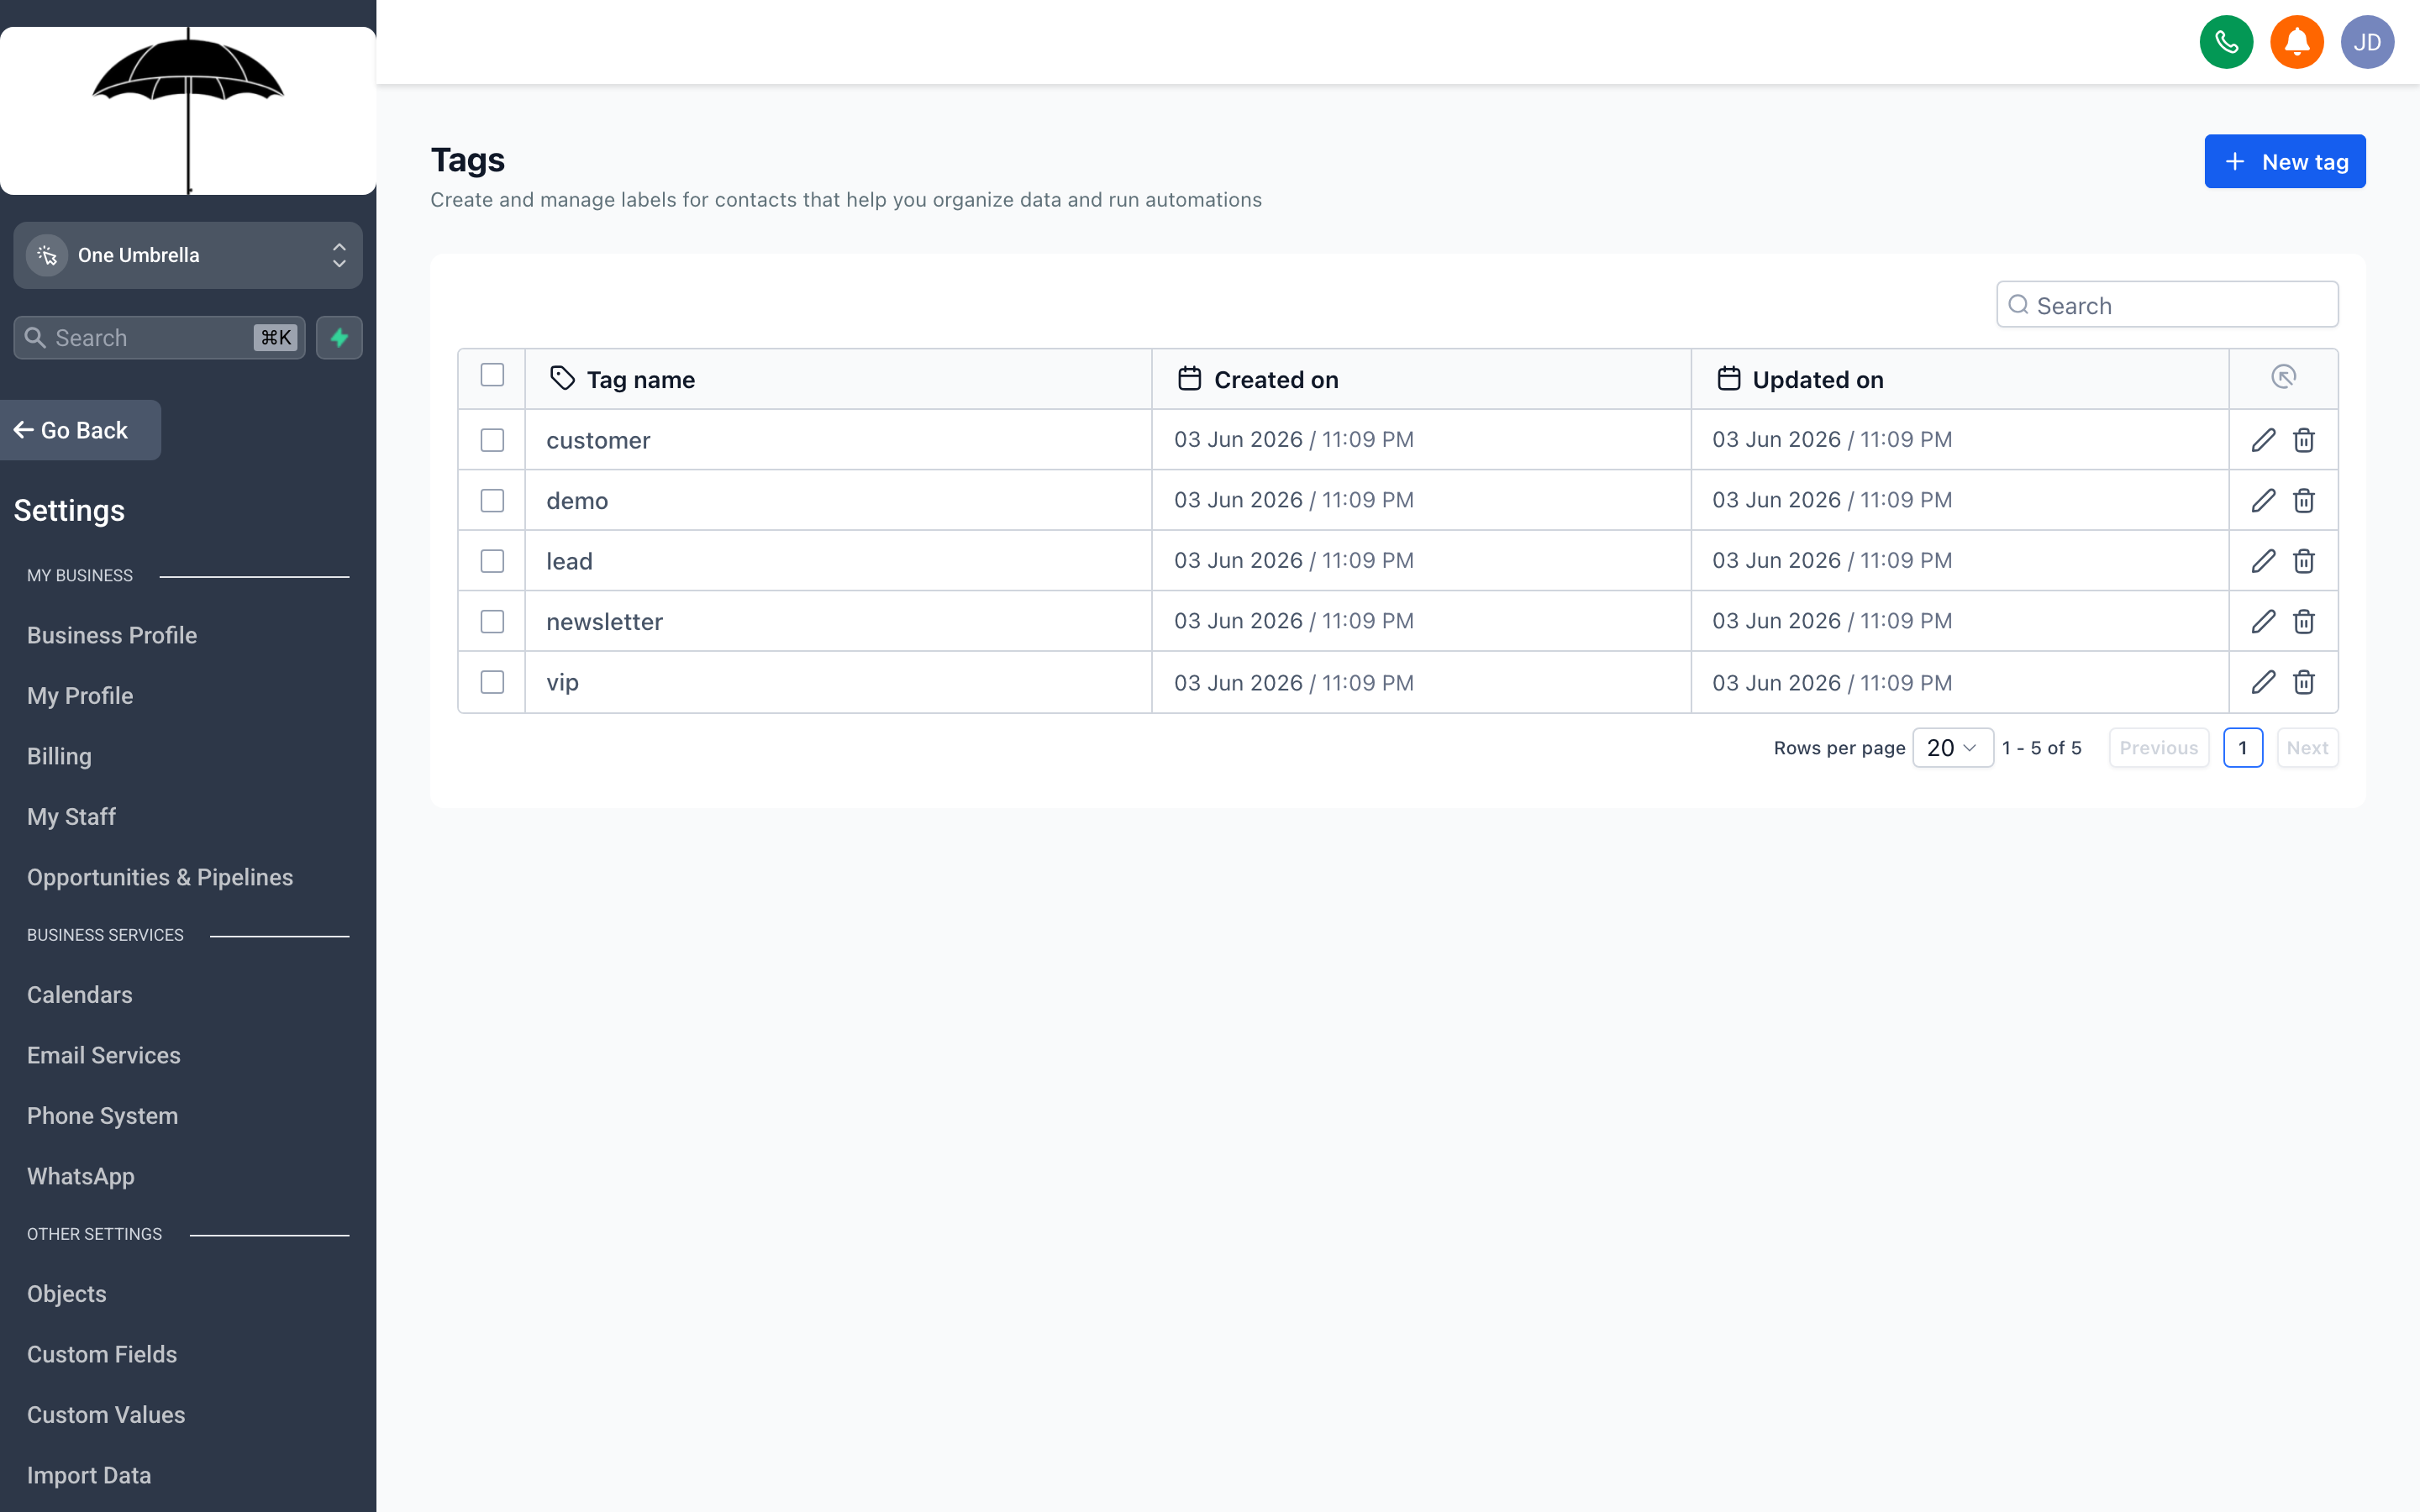
Go to Settings → Tags to view and manage every tag used across your account.
What tags are for
Section titled “What tags are for”A tag is a simple label you attach to a contact record. One contact can have dozens of tags simultaneously. Tags power:
- Workflow triggers — “When tag X is added, start this sequence”
- Workflow conditions — “If contact has tag X, go down this path”
- Contact list filters — “Show me all contacts tagged
attended-webinar-june” - Campaign audiences — Target a campaign to everyone with a specific tag
Managing your tag taxonomy
Section titled “Managing your tag taxonomy”The Tags settings page shows every tag that exists in your account (created manually, by automations, or by imports) alongside a count of how many contacts currently carry each one.
From here you can:
- Rename a tag — the rename applies everywhere the tag is used, including all contact records
- Delete a tag — this removes it from all contact records; use with care
- Search to find tags that may be duplicates or typos (e.g.,
webinar-junevs.webinar_junevs.june-webinar)
Best practices
Section titled “Best practices”- Keep tag names short and descriptive
- Use consistent separators — pick hyphens OR underscores, not both
- Prefix by category for large accounts:
lead-,client-,event-,campaign- - Delete tags from finished campaigns when you’re done — they clutter the filter interface
Custom Objects
Section titled “Custom Objects”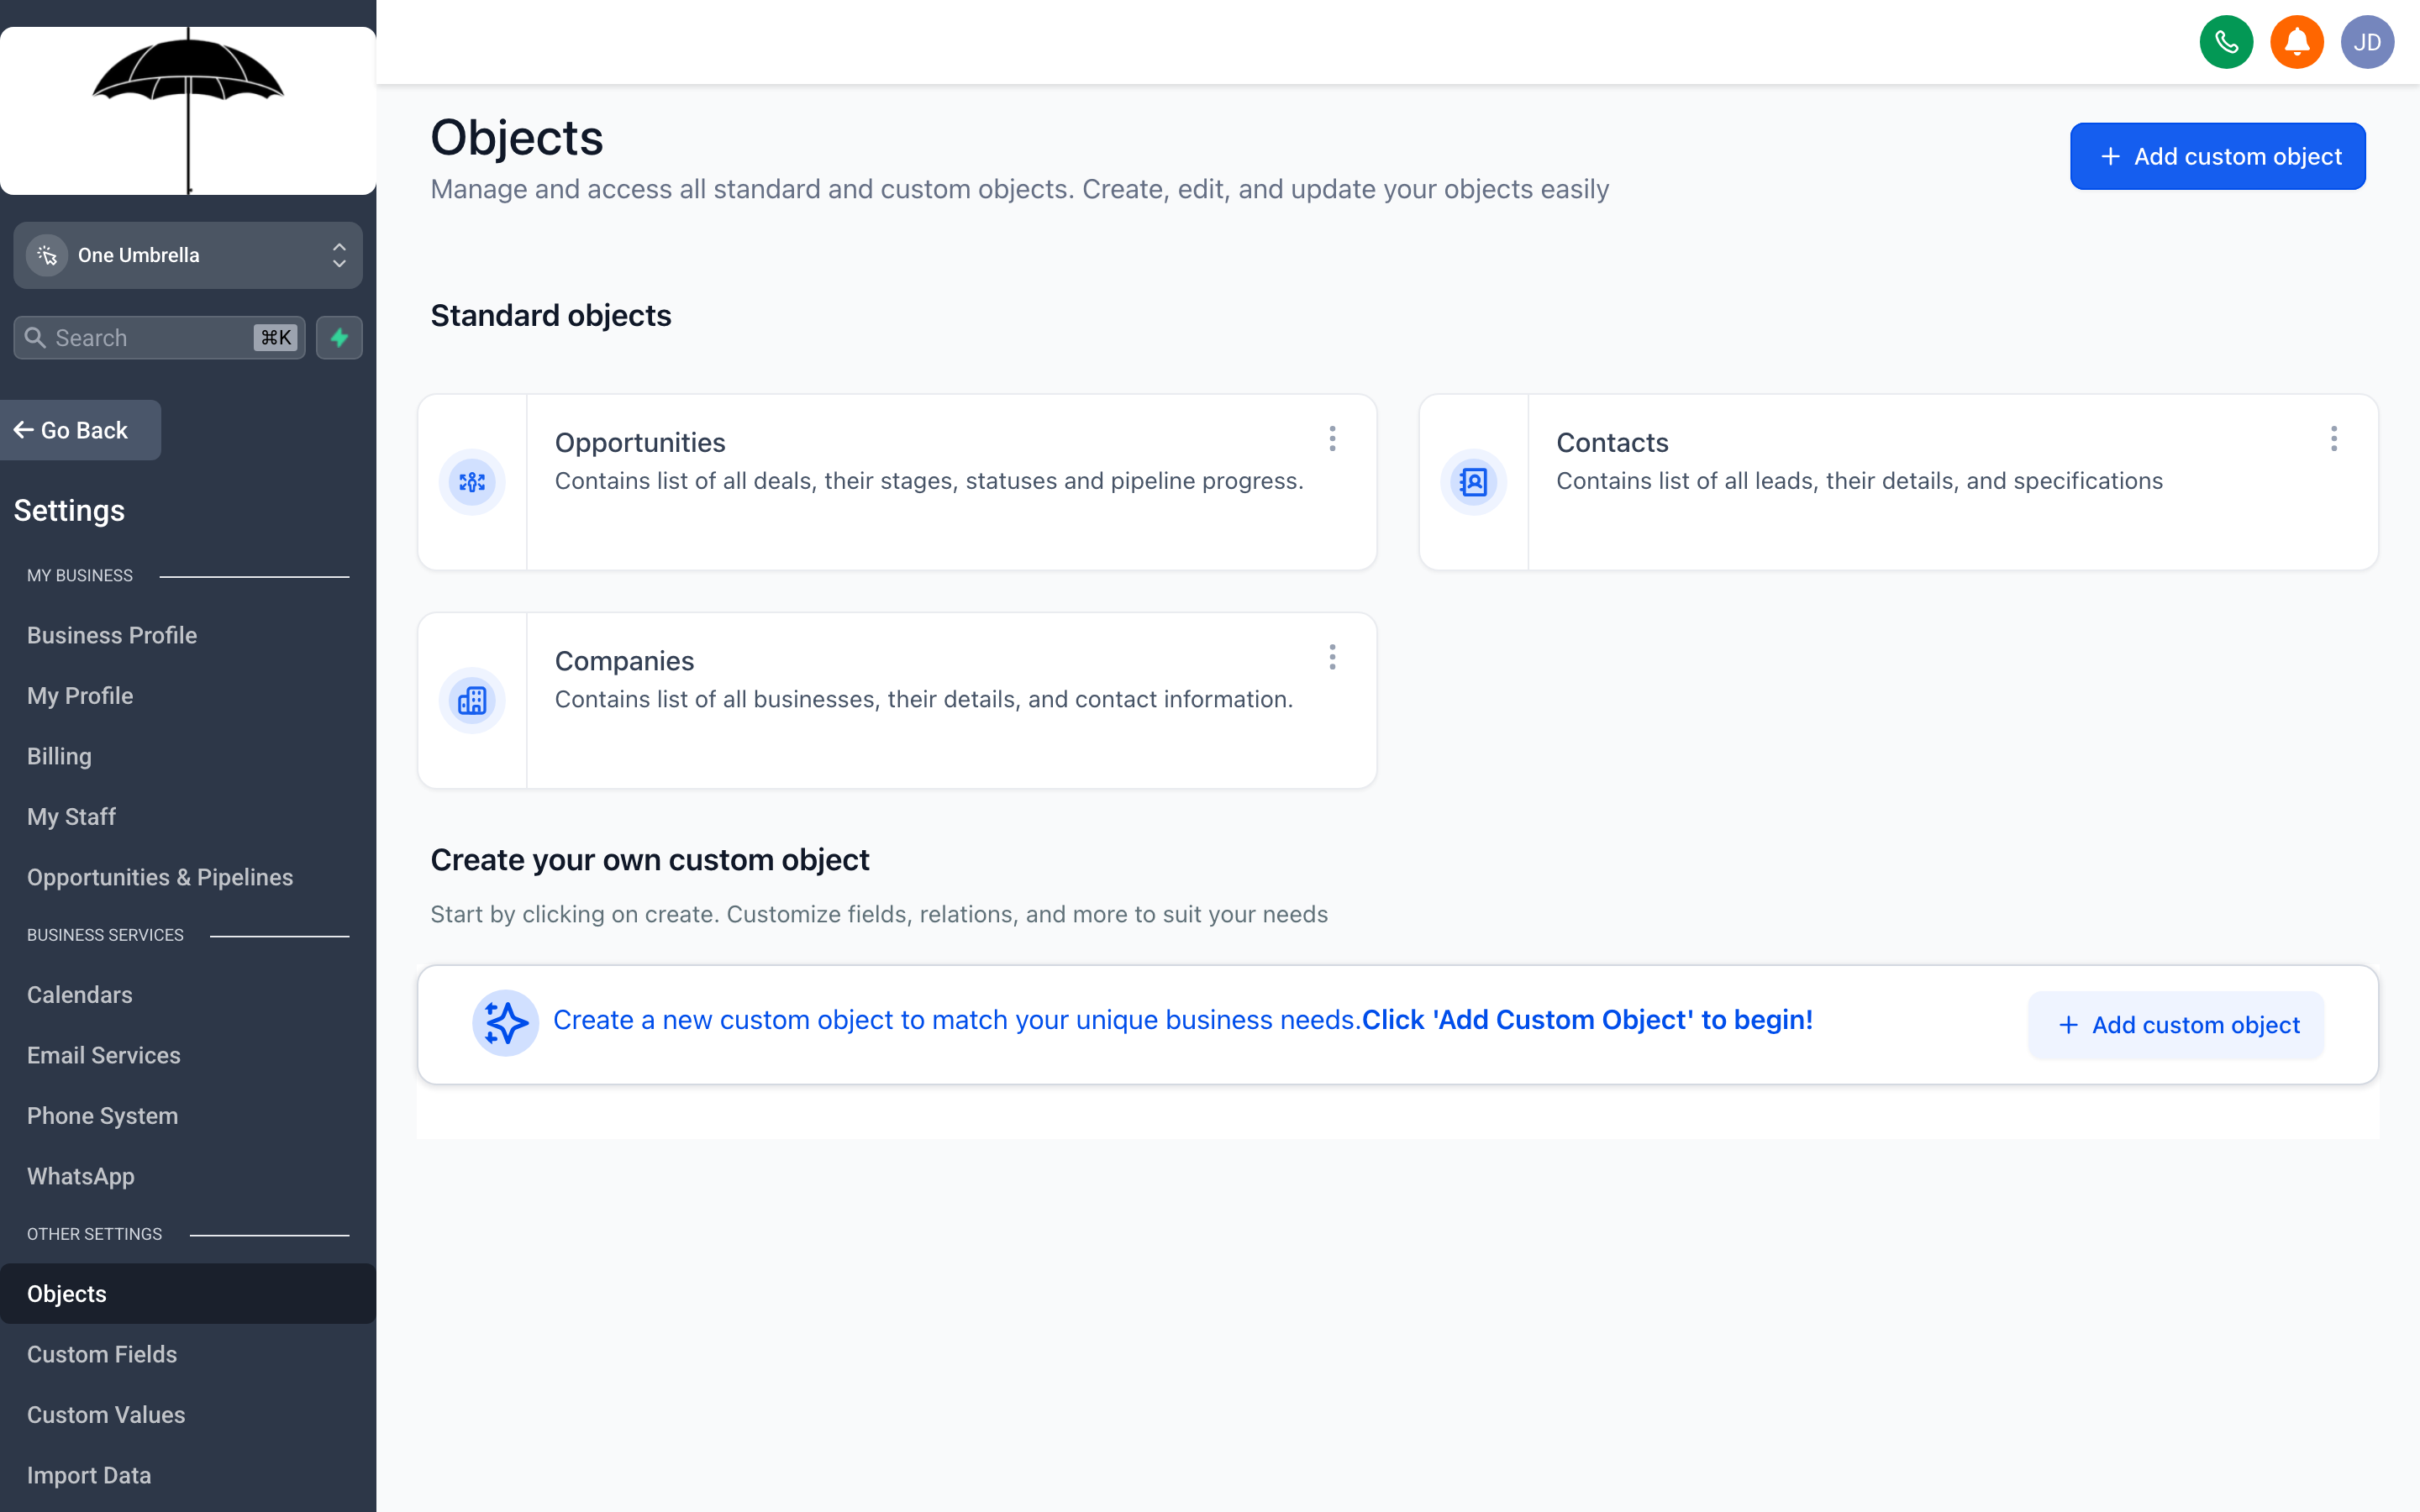
Custom Objects let you model data that doesn’t fit the Contact or Opportunity structure — things like properties, vehicles, subscriptions, or any entity that has its own records and attributes.
Go to Settings → Custom Objects to create data models beyond the standard contact and opportunity types.
When you need a custom object
Section titled “When you need a custom object”The default CRM data model assumes most data connects directly to a contact. That covers a lot of ground. But some businesses need to track a separate entity type with its own attributes and its own relationship to contacts.
Examples:
- A real estate team tracking Properties (address, bed/bath count, listing price) where one contact can be linked to multiple properties
- An auto dealer tracking Vehicles (make, model, VIN, sale date) tied to customer records
- A membership business tracking Subscriptions (plan, start date, renewal date, billing amount) as distinct records that relate to members
Without custom objects, you’d be cramming all that data into contact fields or notes — which quickly becomes unmanageable.
How custom objects work
Section titled “How custom objects work”A custom object has:
- A name (e.g., “Property”, “Vehicle”, “Subscription”)
- Fields you define (just like contact custom fields — text, number, date, dropdown, etc.)
- Relationships to contacts or other records
Once created, records of that object type show up on the relevant contact’s profile, and you can search, filter, and report on them.
Creating a custom object
Section titled “Creating a custom object”- Click Create Object.
- Give the object a Name (singular, e.g., “Property”).
- Add Fields — use the same process as custom contact fields.
- Define the Relationship — which existing object type (Contact, Opportunity) this relates to, and whether it’s one-to-one or one-to-many.
- Click Save.
Manage Scoring
Section titled “Manage Scoring”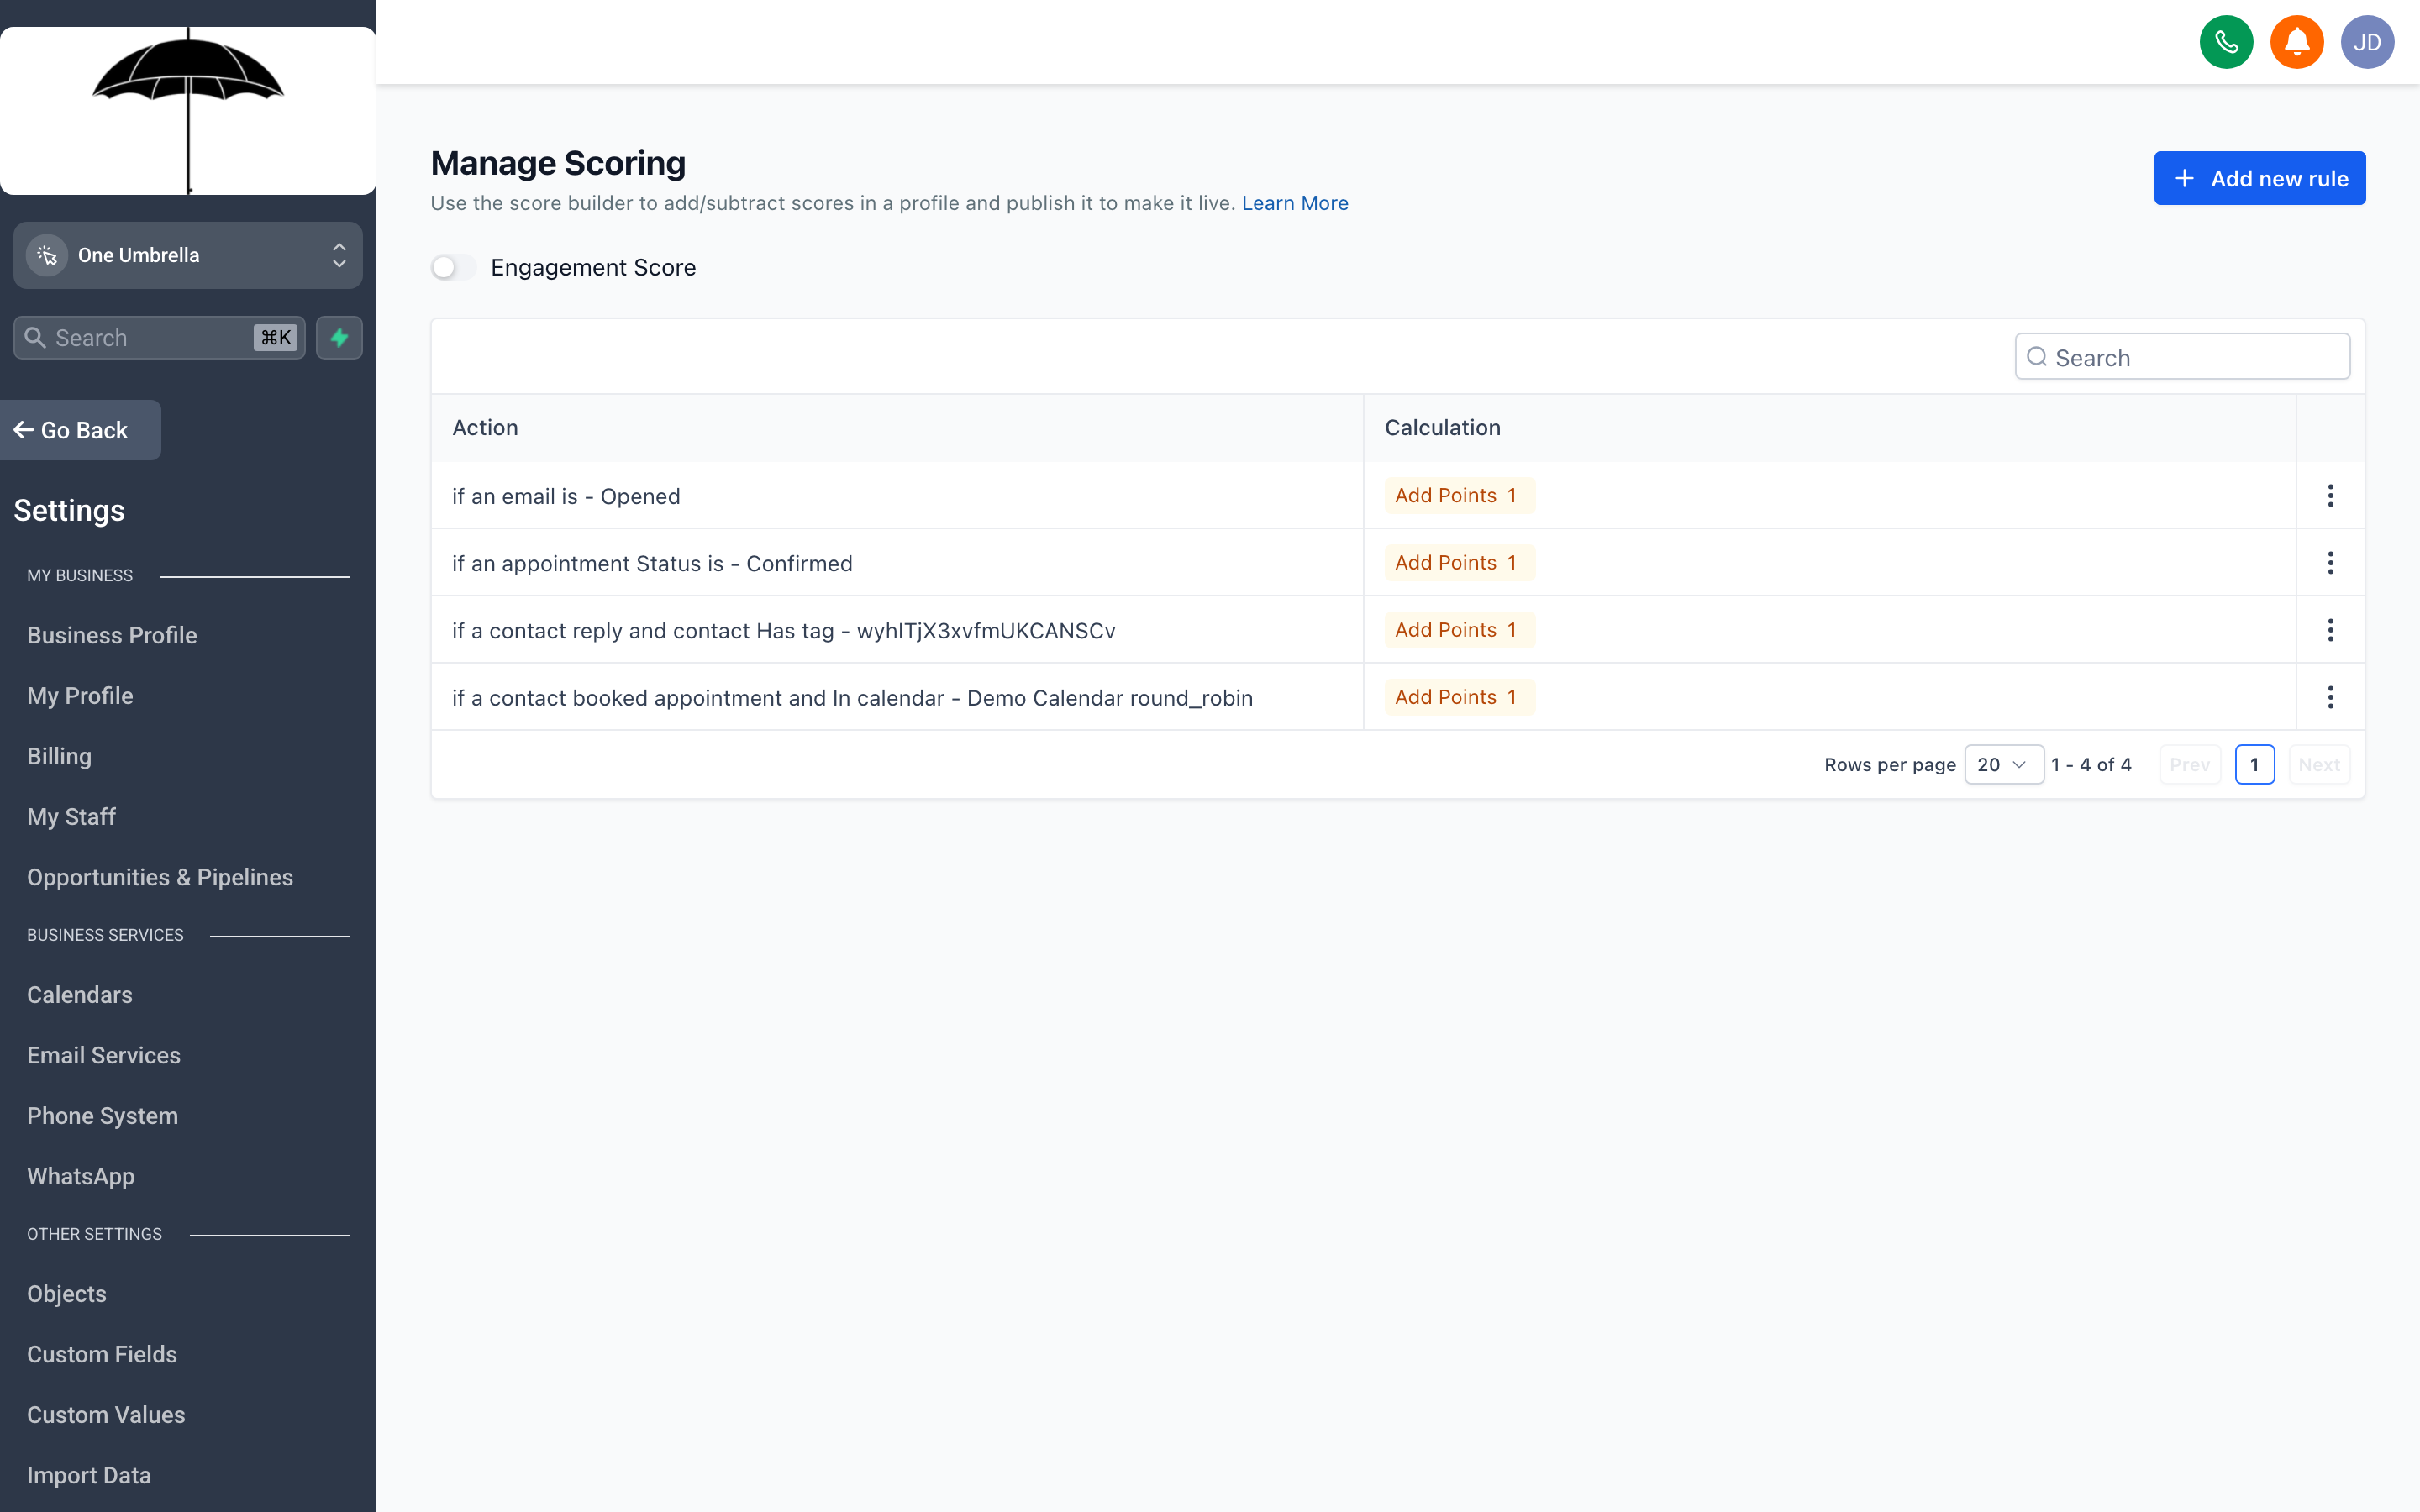
Manage Scoring lets you assign point values to contact behaviors and attributes so your team always knows which leads are most engaged and worth the most attention.
Go to Settings → Manage Scoring to build a lead scoring model for your account.
What lead scoring does
Section titled “What lead scoring does”Lead scoring automatically assigns a numeric score to each contact based on rules you define. The score reflects how engaged or sales-ready a contact is, so your team can prioritize outreach rather than treating every contact the same.
A contact’s score goes up when they do things that signal interest:
- Opens an email
- Clicks a link
- Fills out a form
- Books an appointment
- Visits a specific page
And can go down when they show disengagement:
- Doesn’t open emails over a period of time
- Unsubscribes from a list
- Cancels an appointment
Building a scoring rule
Section titled “Building a scoring rule”- Click Add Rule (or Create Score).
- Choose the Event or Attribute to score on — from the list of available triggers (email opened, form submitted, tag added, etc.).
- Set the Point Value — positive or negative.
- (Optional) Set a Cap so a single behavior doesn’t inflate the score indefinitely (e.g., email opens: +1 point per open, max +5 total).
- Click Save.
Repeat for each scoring criterion that matters to your process.
Using scores in practice
Section titled “Using scores in practice”Once scoring is active, each contact record shows a Score field. You can:
- Sort your contact list by score to surface the most engaged leads
- Create a smart list filtered to contacts above a score threshold (e.g., “Score > 50”)
- Use score thresholds as workflow conditions — “If score reaches 75, notify the sales team”
- Use score drops as re-engagement triggers — “If score drops below 20, add to a win-back sequence”