Contacts
The Contacts list is your full customer database — every lead, client, and prospect in one searchable, filterable table.
Every person your business has ever talked to, marketed to, or worked with lives here. The Contacts section is more than a simple address book: it’s a living database that ties together conversation history, open opportunities, appointments, tasks, notes, and tags — all on a single record. When you understand how to work the Contacts list well, you spend less time hunting for information and more time doing something useful with it.
This page covers the layout, how to add and find contacts, how to make sense of the contact record itself, and the power tools — Smart Lists, Tags, Tasks, Companies, and Bulk Actions — that separate a well-run database from a chaotic one.
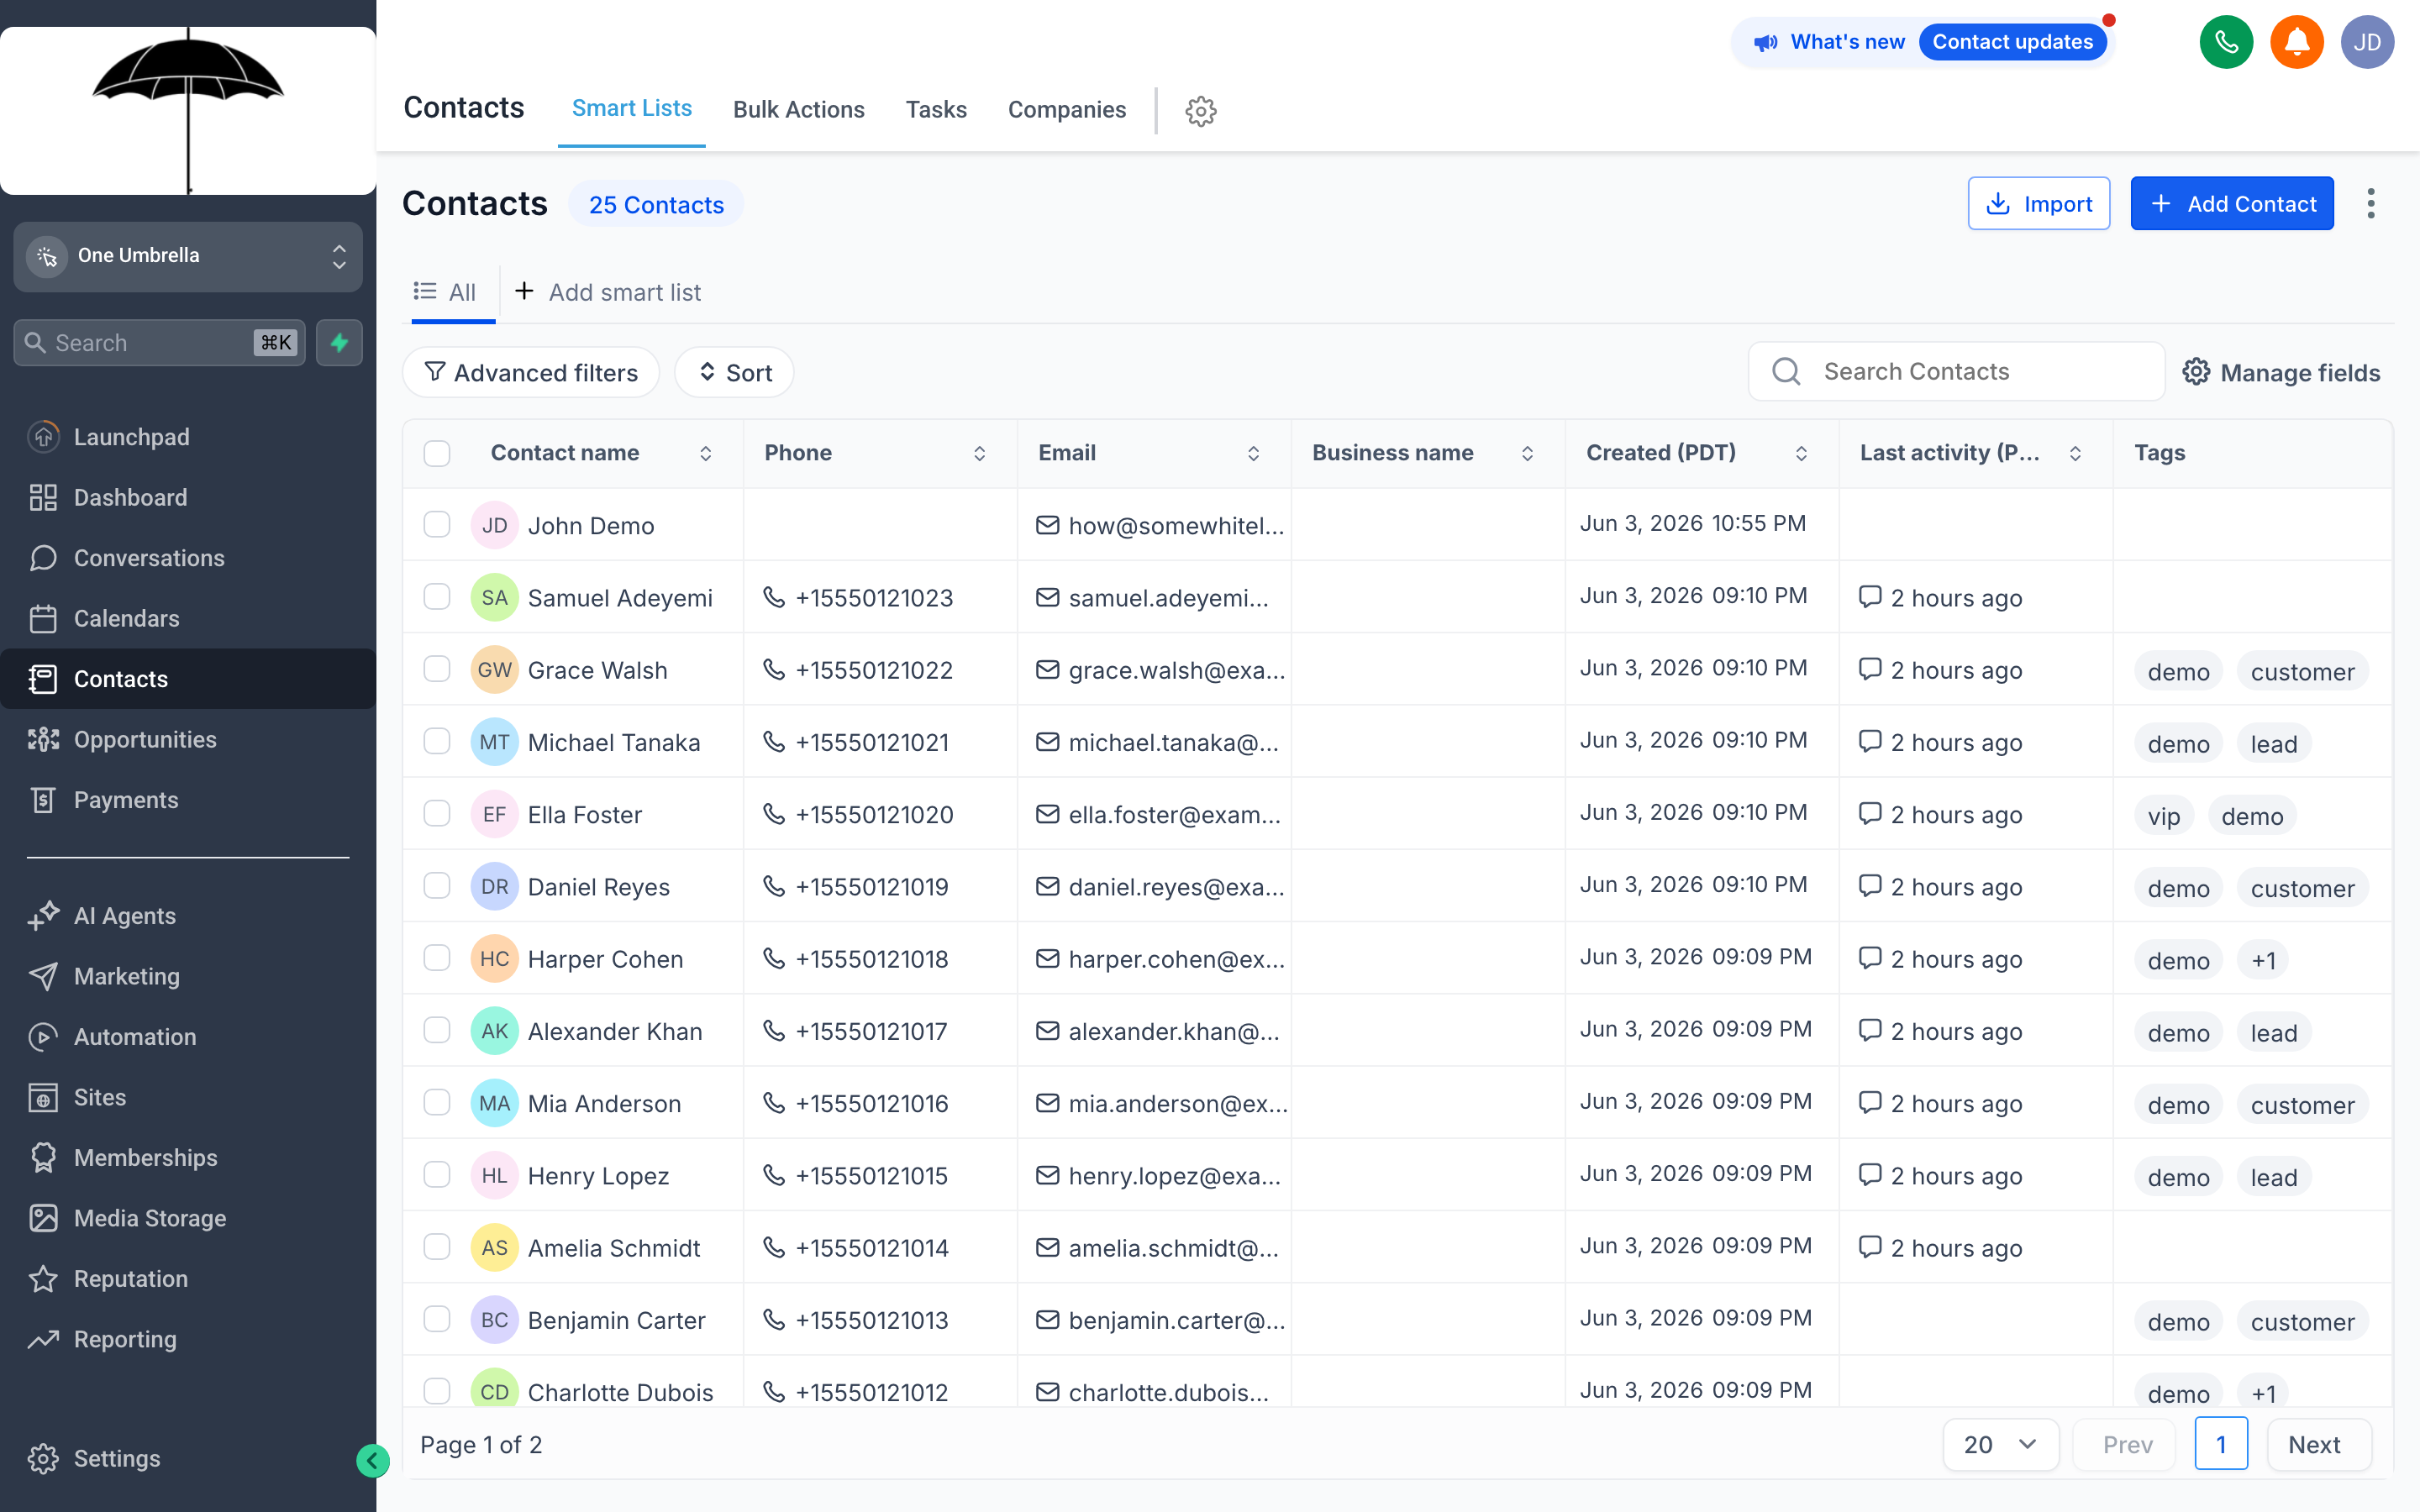
The Contacts list and its columns
Section titled “The Contacts list and its columns”When you click Contacts in the left navigation, you land on the main contacts table. Each row is one person. The default columns typically include:
- Name — first and last name, linked to the full contact record
- Phone — primary phone number (click to call or text, depending on your setup)
- Email — primary email address
- Tags — any tags applied to this contact, shown as small chips
- Source — where the contact came from (e.g., a form submission, manual entry, import, a specific ad campaign)
- Date Added — when the contact was created in your CRM
- Last Activity — the most recent interaction (message, note, appointment, etc.)
You can sort by any column header by clicking it once (ascending) or twice (descending). This makes it easy to, for example, sort by Date Added to see your newest leads at the top.
Smart Lists — saved, auto-updating segments
Section titled “Smart Lists — saved, auto-updating segments”A Smart List is a saved set of filters that applies automatically every time you open it. Unlike a static export, a Smart List updates in real time — as contacts meet or stop meeting the criteria, they appear or disappear from the list without any manual effort.
Think of Smart Lists like saved searches with superpowers. Some examples of useful Smart Lists:
- All contacts tagged
hot-leadwho haven’t had any activity in the last 7 days - Contacts from a specific lead source (e.g., Google Ads) added in the last 30 days
- All contacts with an open opportunity in a specific pipeline stage
- Everyone who has a specific custom field value, like “Service Area: North Region”
Creating a Smart List
Section titled “Creating a Smart List”- Open Contacts and click the Filters button (or look for a filter icon near the search bar).
- Add one or more filter conditions — tag, source, date range, custom field value, etc.
- Once the filters are configured and you can see the resulting contact list, look for a Save as Smart List option (sometimes labeled Save Filter or Save Segment).
- Give the Smart List a descriptive name, like “Hot Leads – No Activity 7 Days”.
- Click Save.
The Smart List appears in your left sidebar under Smart Lists (or in a dropdown near the list view). Click it any time to return to that filtered view instantly.
Searching and filtering contacts
Section titled “Searching and filtering contacts”Quick search
Section titled “Quick search”Type any name, phone number, email address, or keyword into the Search bar at the top of the Contacts page. Results narrow as you type. This is the fastest way to pull up a specific person.
Filtering
Section titled “Filtering”For broader queries — “show me everyone tagged warm-lead in zip code 90210” — use the Filter panel:
- Click Filters or the filter icon.
- Choose a filter type from the dropdown: Tag, Source, Custom Field, Date Added, Last Activity, and more.
- Set the condition (e.g., Tag → contains →
warm-lead). - Add additional filter rows as needed — filters stack (AND logic by default).
- The contact table updates immediately to show matching contacts.
Combine search and filters for pinpoint precision: filter by tag, then search by name within those results.
Adding a contact
Section titled “Adding a contact”To add a single contact manually:
- Click + Add Contact in the upper-right area of the Contacts screen.
- Fill in the First Name and Last Name fields.
- Add at least one way to reach them: Phone Number or Email Address (or both).
- (Optional) Fill in any other relevant fields: company, address, custom fields your account uses.
- Add Tags if appropriate — this is a good moment to classify the contact correctly from the start.
- Click Save (or Create Contact).
The contact appears in your list immediately and has a fresh, empty record ready for activity.
The contact record
Section titled “The contact record”Click any contact’s name in the list to open their full record. This is where everything about a single person lives.
Profile fields
Section titled “Profile fields”The left or top section shows the core profile: name, phone, email, address, company, tags, and any custom fields your account has configured. Click the Edit button (or click a field directly) to update information. Changes save immediately.
Activity timeline
Section titled “Activity timeline”The timeline is a chronological log of everything that’s happened with this contact: messages sent and received, notes added, appointments booked or completed, workflow enrollments, stage changes, and more. The newest activity is at the top. This is the fastest way to understand where you left off with someone.
Conversation history
Section titled “Conversation history”The Conversations tab (or section) within the contact record shows the full thread of every message exchanged with this contact, across all channels. You can reply directly from here instead of switching to the Conversations inbox if you prefer.
Appointments
Section titled “Appointments”Any appointments booked with this contact appear here — past and upcoming. You can see which calendar they’re on, the date and time, and the status. Depending on your configuration, you can also book a new appointment directly from the contact record.
Opportunities
Section titled “Opportunities”If this contact is associated with any deals in your pipeline, they’re listed here — the opportunity name, pipeline stage, dollar value, and status. You can open the opportunity for full details or create a new one from this view.
The Notes section is a free-text scratch pad for anything that doesn’t fit a structured field. Use it for call summaries, reminders to yourself, or context that helps the next person on your team understand the history. Notes are visible to all users with access to this contact.
Tags appear directly on the contact profile and can be added or removed at any time. See the Tags strategy section below for guidance on how to use them well.
Tags — organizing contacts at scale
Section titled “Tags — organizing contacts at scale”Tags are short, free-form labels you apply to contacts to categorize them for filtering, segmentation, or automation. A contact can have any number of tags.
Common uses for tags:
- Lead status —
cold,warm,hot,customer,churned - Source —
google-ads,referral,trade-show-2025,organic - Interest or service type —
interested-premium,service-hvac,service-plumbing - Workflow flags —
needs-follow-up,do-not-contact,review-requested - Campaign tracking —
promo-may2026,reactivation-campaign
Adding a tag to a contact
Section titled “Adding a tag to a contact”In the contact record, find the Tags field. Type the tag name and press Enter (or select from suggestions if the tag already exists). The tag is applied immediately.
Tagging conventions that actually work
Section titled “Tagging conventions that actually work”Avoid: Hot Lead, hot lead, HotLead (three tags, same meaning, none of them findable with a single filter).
Use: hot-lead — one tag, every time, for every user.
Tasks — tracking to-dos tied to contacts
Section titled “Tasks — tracking to-dos tied to contacts”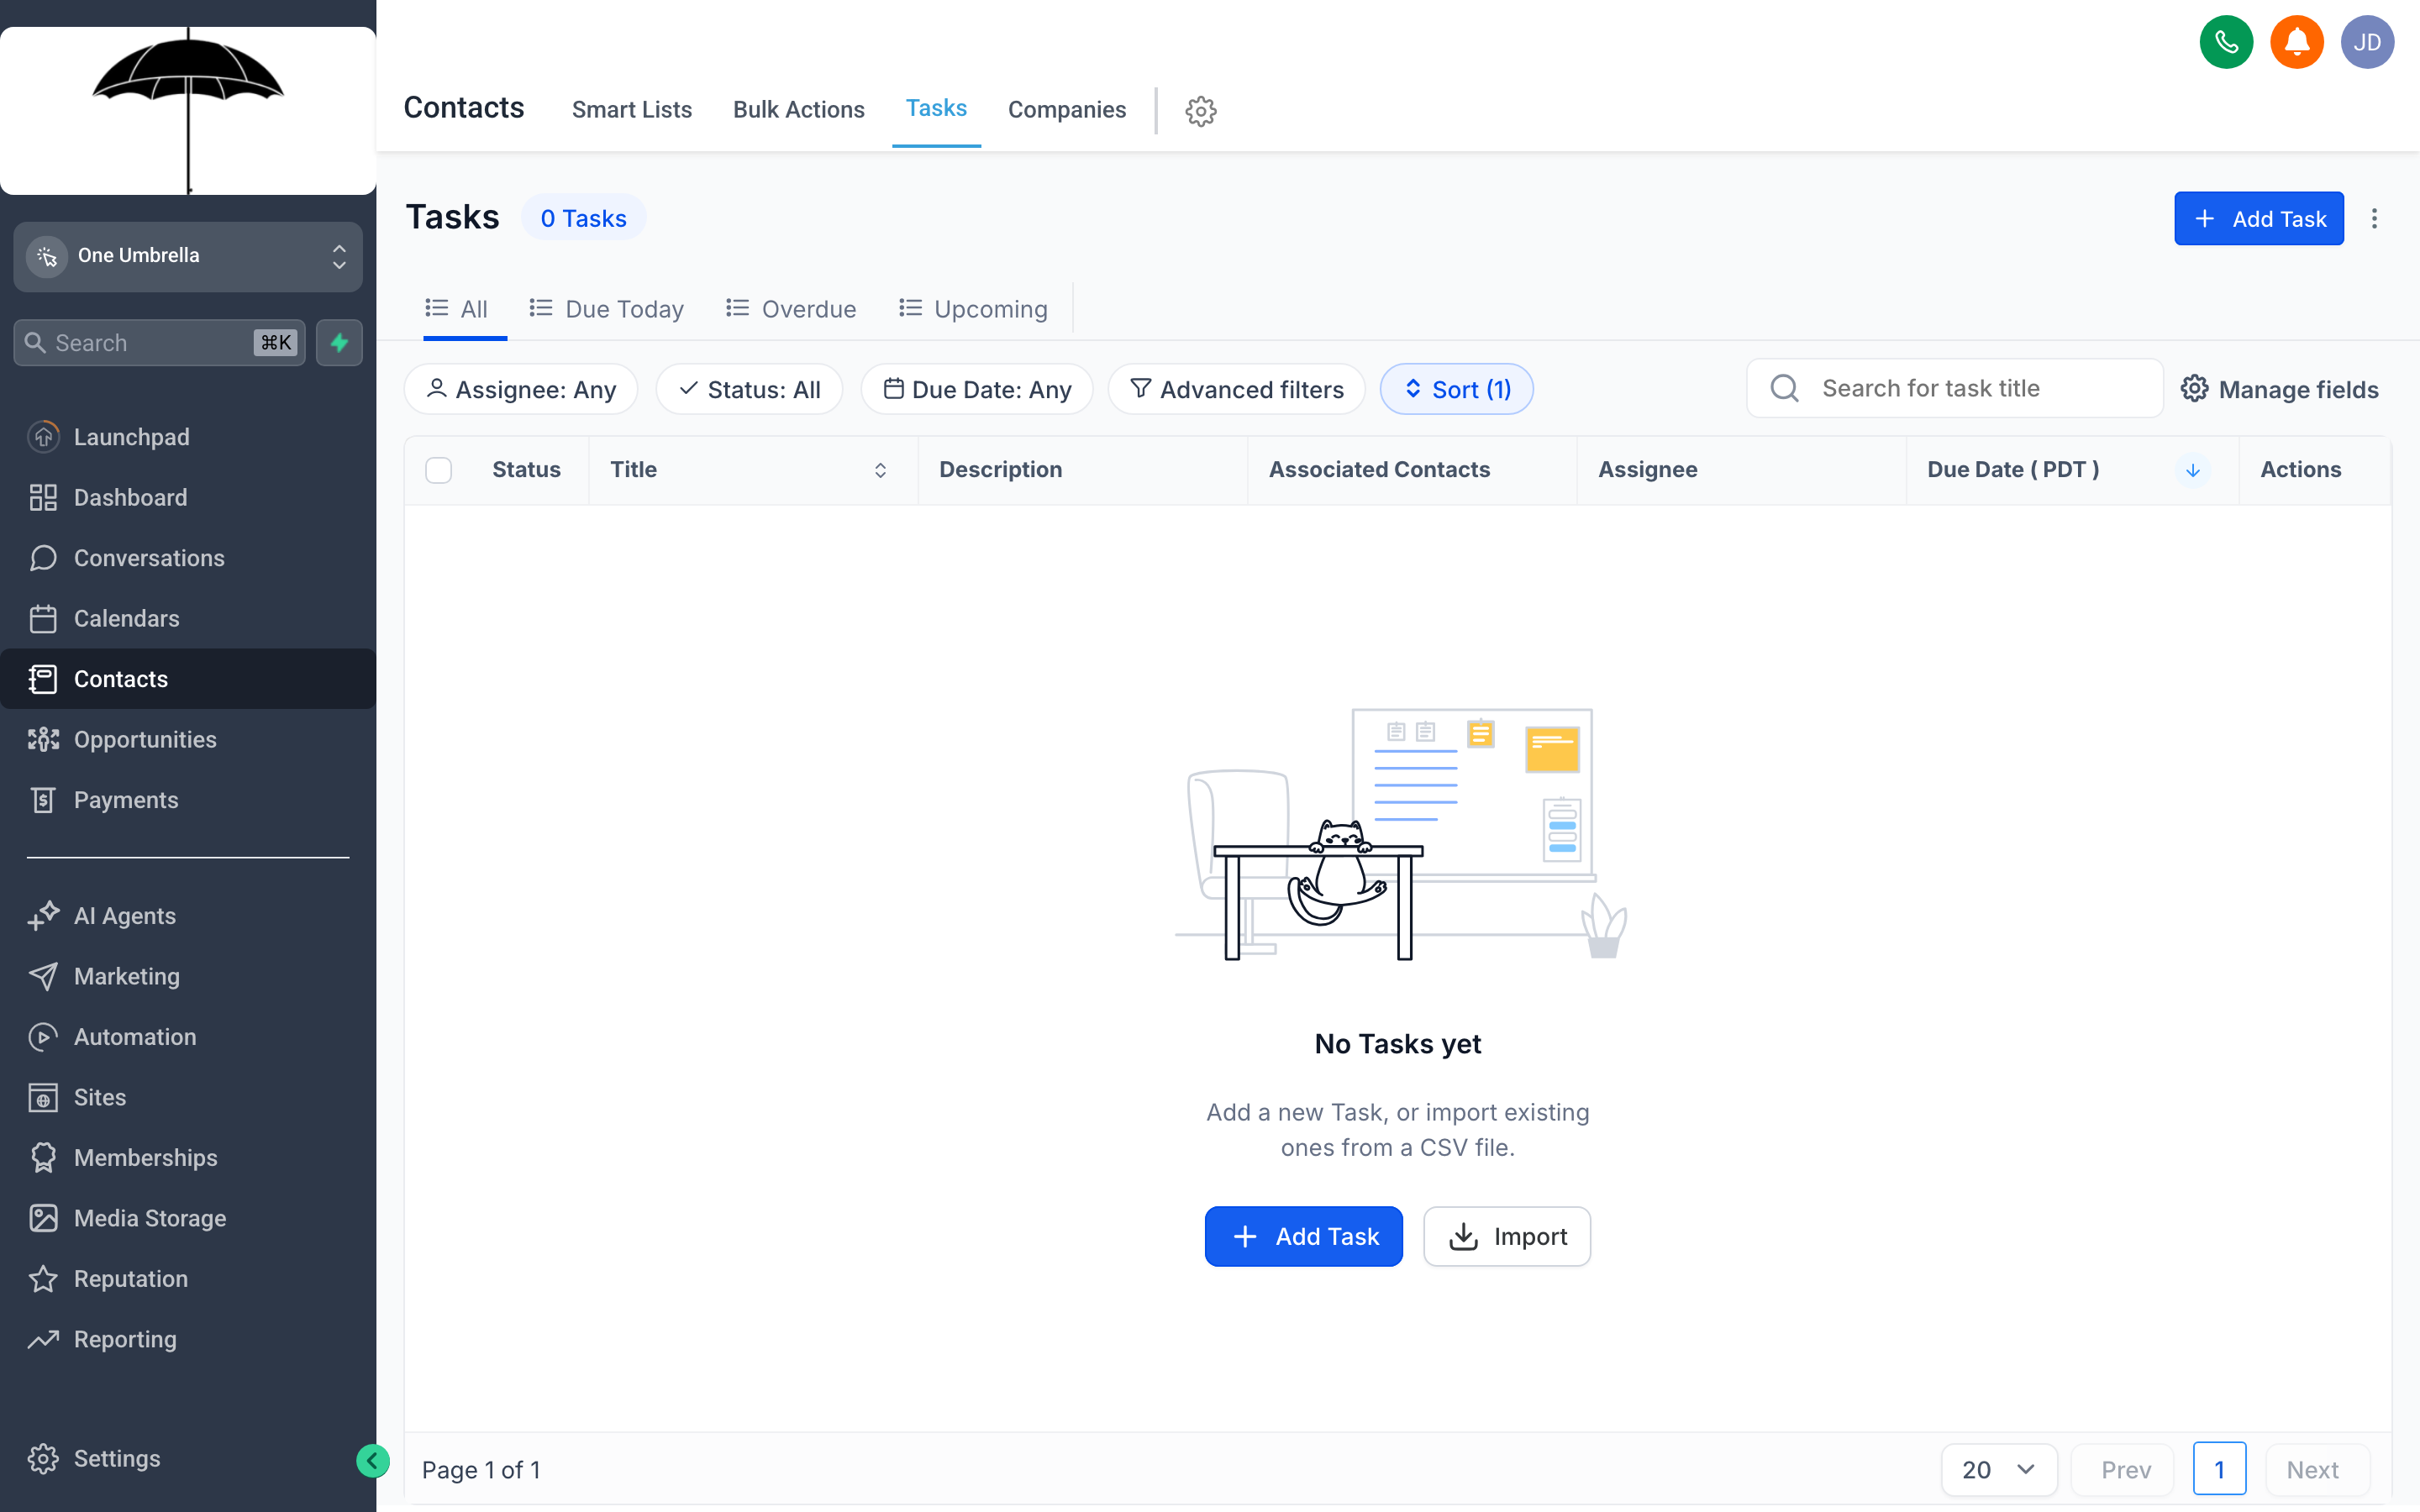
Tasks give every follow-up a clear owner and a deadline, so nothing slips through the cracks.
A Task is a to-do item linked to a specific contact. It has a title, a due date, and an assigned user. When you set a task, the contact record shows it as outstanding until someone marks it complete. Tasks are how you make sure “call this person Friday” doesn’t live only in someone’s head.
Creating a task from a contact record
Section titled “Creating a task from a contact record”- Open the contact record.
- Find the Tasks section (often in a tab or sidebar panel within the record).
- Click Add Task or + New Task.
- Write a clear, specific title — not just “Follow up” but “Call re: proposal sent 6/2” or “Send price quote for Package B.”
- Set a Due Date — pick the date (and optionally the time) when this task needs to be done.
- Assign it to the appropriate Team Member if your account has multiple users.
- Click Save.
The task now appears on the contact record and in any task dashboards or reports your account uses.
Completing a task
Section titled “Completing a task”Open the contact record, find the task, and click the checkbox or Mark Complete button next to it. Completed tasks are logged in the activity timeline so there’s a permanent record that it was done and when.
Companies — grouping contacts for B2B
Section titled “Companies — grouping contacts for B2B”
Companies let you group individual contacts under a single business record — essential for B2B pipelines where you’re selling to organizations, not just individuals.
If your business sells to other businesses, Companies lets you organize contacts the way your pipeline actually works. A company record represents a business, and individual contacts can be linked to it. This means you can see all the stakeholders at Acme Corp in one place and track activity at both the company and the individual level.
Creating a company
Section titled “Creating a company”- Navigate to Contacts and look for a Companies tab or sub-menu (it may be in the top navigation within Contacts, or in its own section).
- Click Add Company or + New Company.
- Enter the company name and any other available fields: website, industry, phone, address.
- Click Save.
Linking contacts to a company
Section titled “Linking contacts to a company”- Open a contact record.
- Find the Company field in the profile section.
- Start typing the company name — if it exists, it will appear in the dropdown. Select it.
- Click Save (or it may save automatically depending on your setup).
That contact is now associated with the company. From the company record, you can see all linked contacts, their activity, and any opportunities tied to the company.
Bulk Actions — managing many contacts at once
Section titled “Bulk Actions — managing many contacts at once”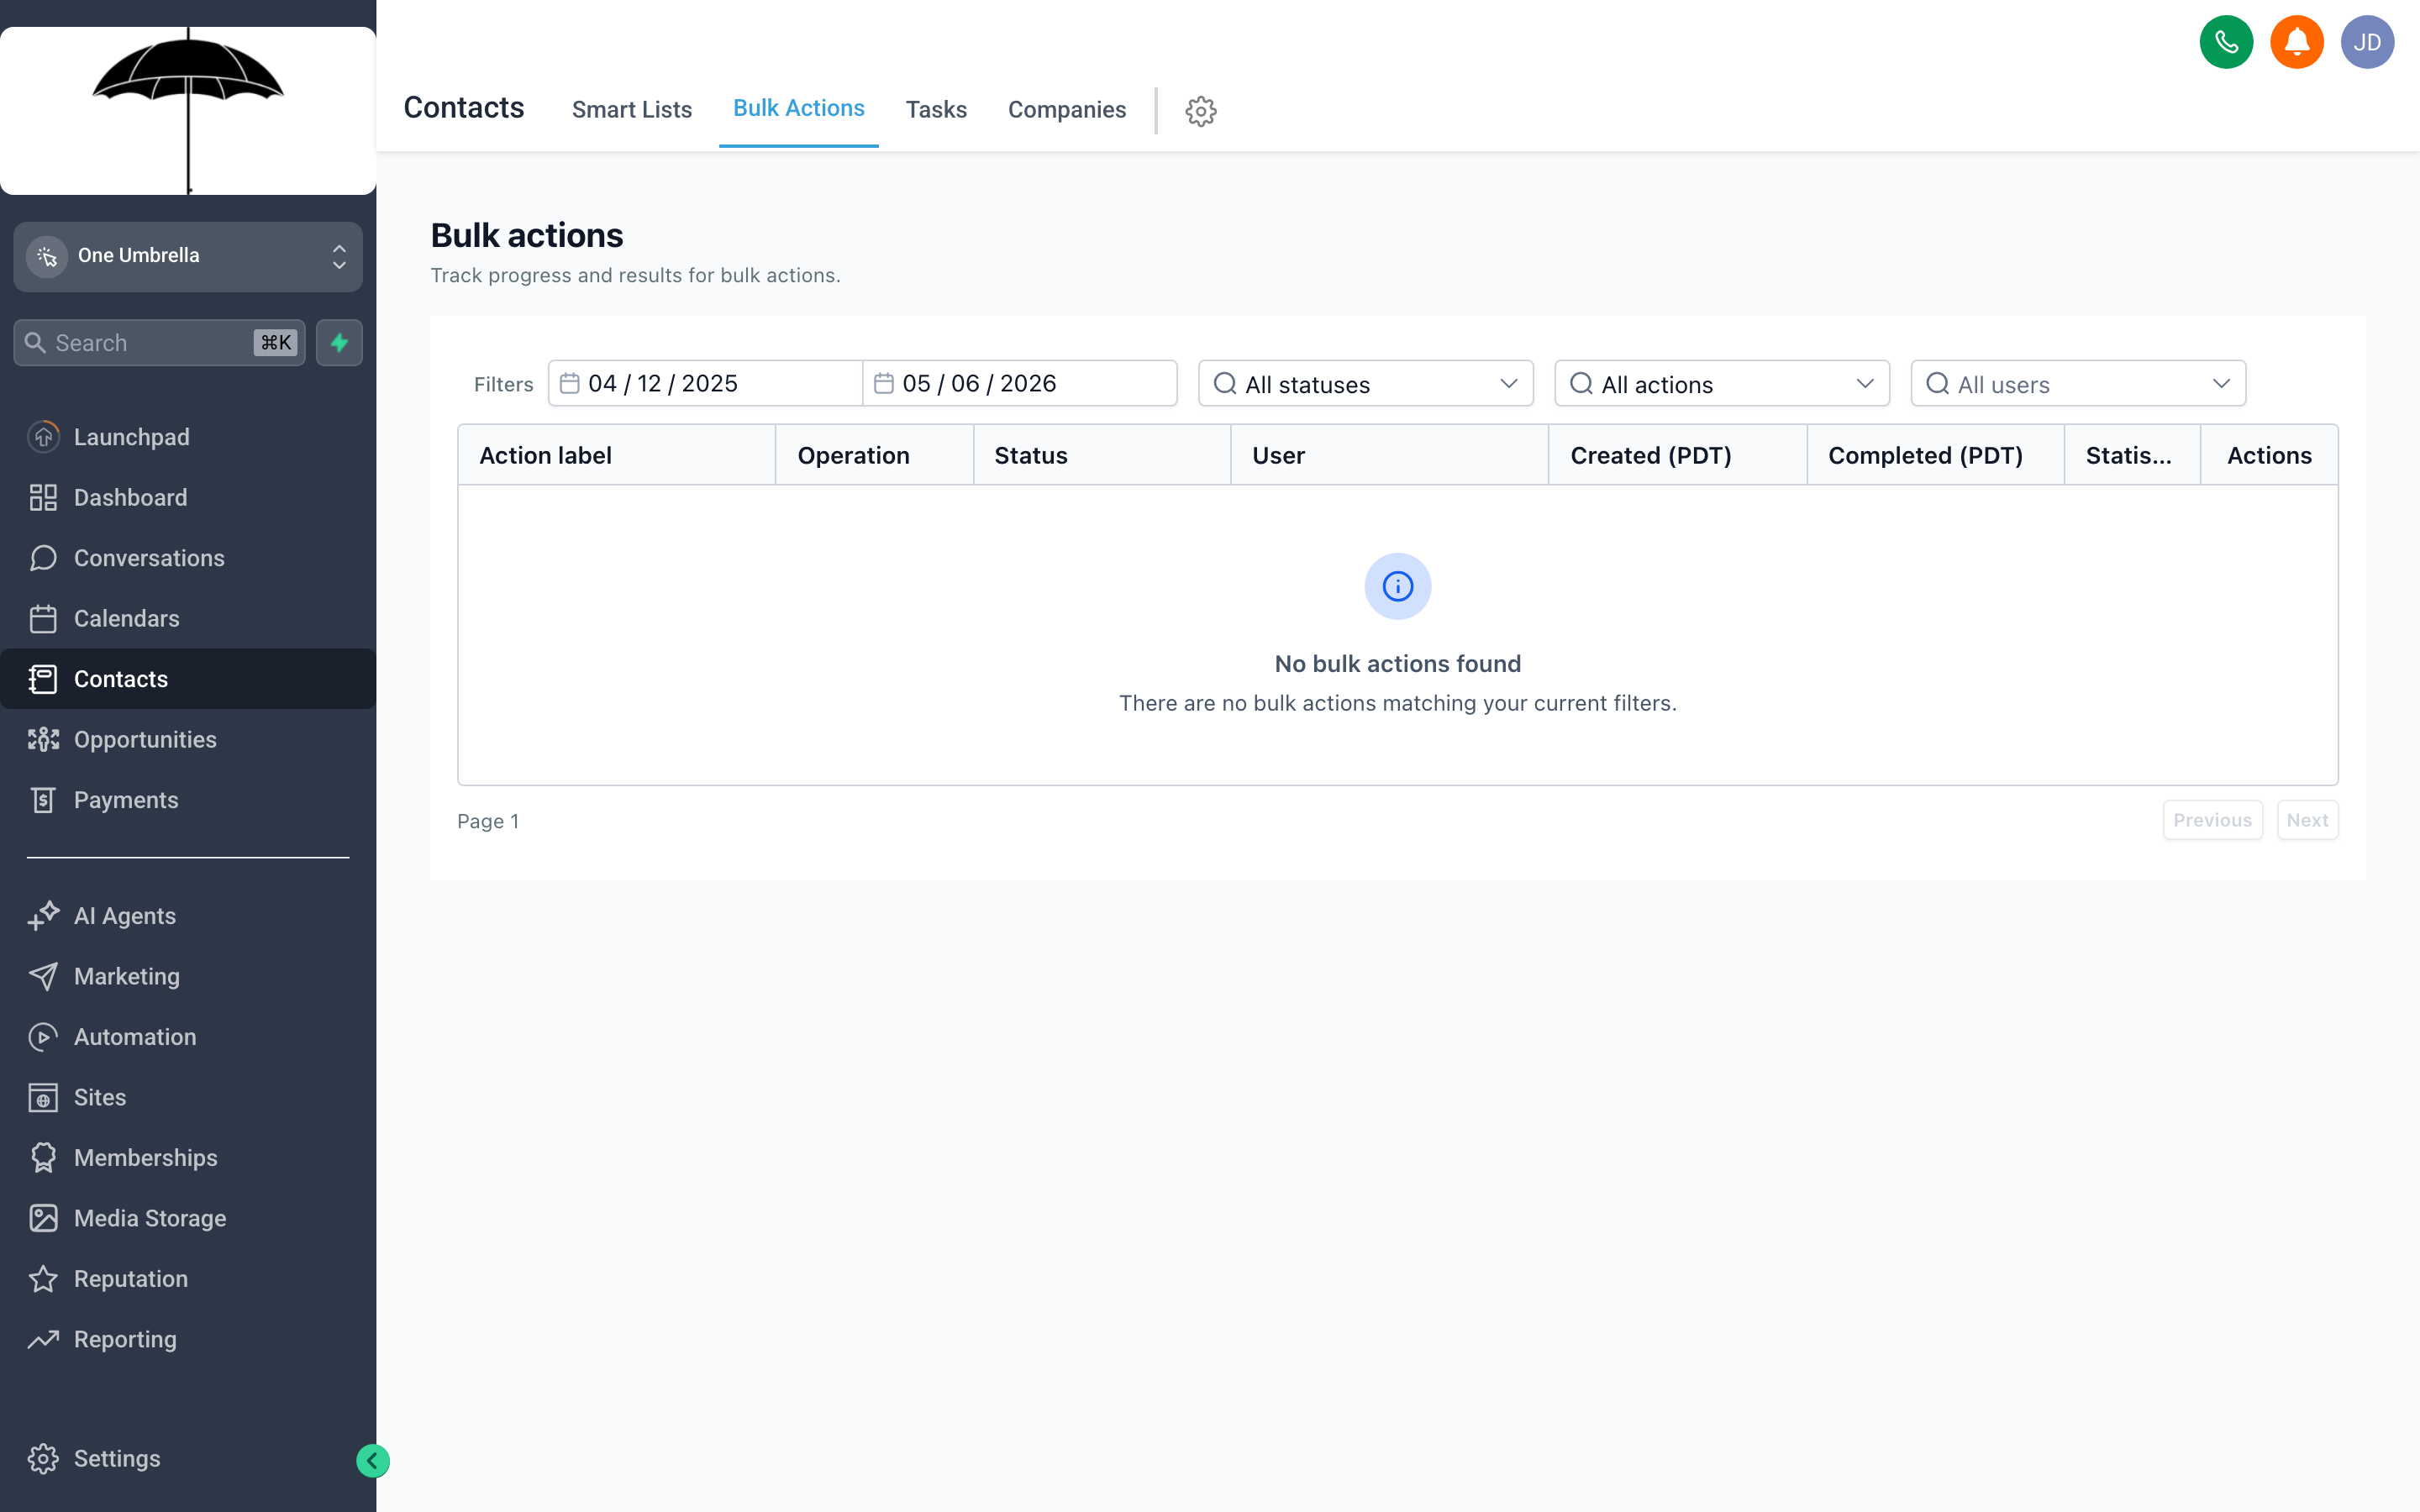
Select multiple contacts and act on all of them at once — tag, enroll in a workflow, export, or delete in one operation instead of one-by-one.
When you need to do the same thing to dozens or hundreds of contacts, Bulk Actions are how you get it done without clicking through records individually.
Selecting contacts for a bulk action
Section titled “Selecting contacts for a bulk action”- In the Contacts list (or within a Smart List), check the checkbox next to each contact you want to include. Or, click the checkbox in the column header to select all contacts currently visible on the page.
- If you need to select across multiple pages, look for a “Select all [N] contacts” option that appears after you select the page — this extends the selection to all filtered results, not just the visible page.
Available bulk actions
Section titled “Available bulk actions”Once contacts are selected, click the Bulk Actions button or look for an action menu that appears at the top or bottom of the list. Common options include:
- Add Tag — apply one or more tags to every selected contact at once
- Remove Tag — strip a tag from every selected contact
- Add to Workflow — enroll all selected contacts into an automation (useful for campaigns or follow-up sequences)
- Add to Smart List — manually push selected contacts into a saved list
- Export — download the selected contacts as a CSV file
- Delete — permanently remove the selected contacts (see caution below)
Smart use of bulk actions with Smart Lists
Section titled “Smart use of bulk actions with Smart Lists”Bulk actions and Smart Lists work especially well together. Build a Smart List that captures exactly the group you want to act on — say, “All contacts tagged cold with no activity in 90 days” — then use a bulk action to add them all to a reactivation workflow. One Smart List, one bulk action, potentially hundreds of automated follow-ups triggered in seconds.
Keeping your contact database clean
Section titled “Keeping your contact database clean”A database that nobody trusts is a database nobody uses. A few habits that keep your contacts list reliable:
Establish tagging rules. Agree on what tags exist, what they mean, and when they get applied. Write it down. Revisit it quarterly.
Merge duplicates when you spot them. Duplicates accumulate over time — same person who filled out two forms with slightly different emails. Most CRMs have a merge tool (check your Settings or Contacts menu). Use it.
Fill in fields on first contact. It’s much easier to capture company, source, and custom fields when a contact is created than to audit thousands of records later.
Archive or tag contacts you no longer pursue. Rather than deleting everyone who never converted, tag them archived and exclude them from your active Smart Lists. They’re still there if you ever want to run a win-back campaign.